


We decided to pave the way for anyone’s is looking to dress its Zbrush avatar with the amazing Marvelous Designer as It’s very satisfying to create an outfit that will have amazing folds real-alike. This definitely will help your character reach a detailed finish with much less effort.
Long ago I found myself for the first time I imported my Zbrush character into Marvelous, expending quite some time realizing why Marvelous was not running smoothly, why the avatar was not in the centre of the scene, or what is worst…reimporting the outfit back into Zbrush and seeing the new cloths oversized and out of place.
I hope this will help you prepare your characters to be a good avatar for Marvelous Designer attending the particularities of both systems and understanding why and how you can travel between these two heavyweights.
Today we need to create a puffer jacket that fits our character already in position. Our driver in this workflow is ZBrush and, despite now we have nice brushes to model cloth in Z, I prefer to see how Marvel (Version 10) brings those hassle-free natural folds.
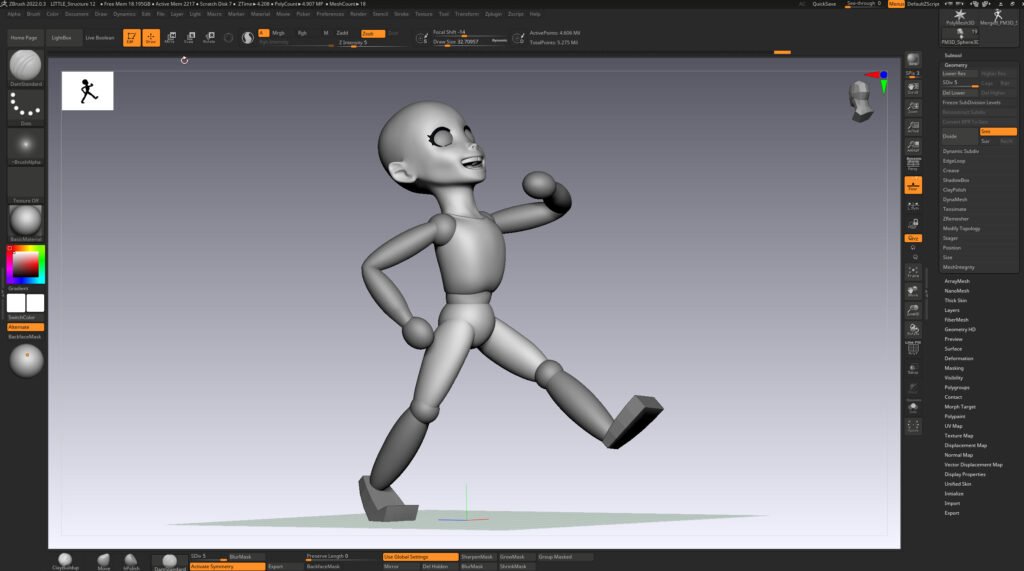
First of all, we are going to have a look at our model in ZBrush which is the one we are going to dress up and therefore we will call it from now on, our ‘avatar‘.
This character will need to land into Marvelous in the right way to prevent doubling our effort, therefore we need to consider certain points before starting with the export.

Table of Contents
Point 1: Is my avatar size too big or too small for Marvelous or Zbrush?
The character will be exported as a “.obj” file. This file will include our character with its setup details that also pack the scale’s units.
Marvelous will require us to define the scale of our Avatar during the import, therefore would be nice to ensure that our “obj.” and the Marvelous project have the same units.
Zbrush allows us to define the scale in different units (mm, cm, in and, ft). I normally use ‘mm’ as a personal preference, but before proceeding with the units selection and the final export, we need to ensure that our avatar will be in Marvelous with a height between 1200mm to 2000mm. The reason behind this is overall to get a better cloth simulation, due to longer fabrics producing better folds and Marvelous raises tonnes of issues when the avatar is too small or too big as its render is set up to work with near-human scales.
… On the other hand, we need also to consider that Zbrush prefers two digits (10 mm to 99 mm) in the Y-axis for us to model quietly and not have issues with pointer, brushes or performance in general.
I reckon the idea is to try to please both.
In Marvelous I want my character to have 1400 mm as height but at the same time in ZBrush, I want it as 14 mm in the “Y-axis”.
How can we please Marvelous & Zbrush in terms of size?.
The best way to illustrate this point is by using the Marvelous avatar as example.
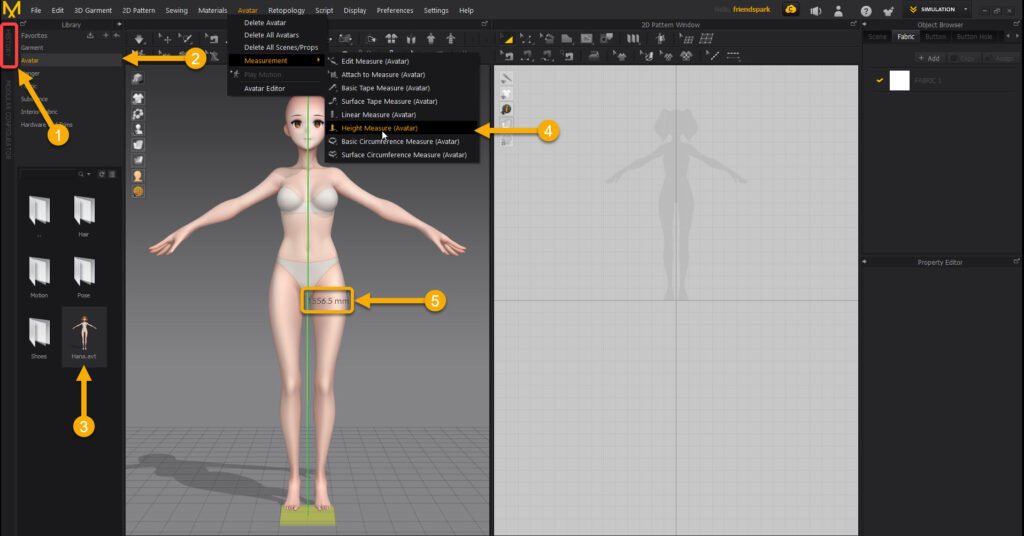
Fist of All we go to Marvelous, we load one of its avatars and we check its size by using the “Measurement tool” Avatar > Measurement > Height Measure (Avatar).
- We need to open the History Tag.
- Find the Avatar folder.
- Open the Stylized folder and select Hana.avt (I like the manga girl).
- Now is the turn of the “Measurement Tool”. This will make the girl’s hair disappear… do not get panic, its normal.
- It will appear as a green line that you need to be positioned at the top of the head to get the height of the avatar (1556mm approx.).
I know that you hate me at this point as your mouse pointer is tracing constantly a green line everywhere you move, adding new measures when you click on the model, you also do not see the hair of the girl and the way to get it back… and the measurement lines you draw do not go away… let’s see how we can go back to normal… it’s easy when someone tells where the solution is as it is not straightforward.
I know you were trying to go to the Measurement Tool to somehow select it again to get it unselected and it does not go in that way…frustrating, then what you should do instead is to click in some of the Select/ Edit icons above the Avatar (squared below) or just with the “Select” Hotkey “Q“. Now we can see the line is not chasing our pointer and the hair came back!.

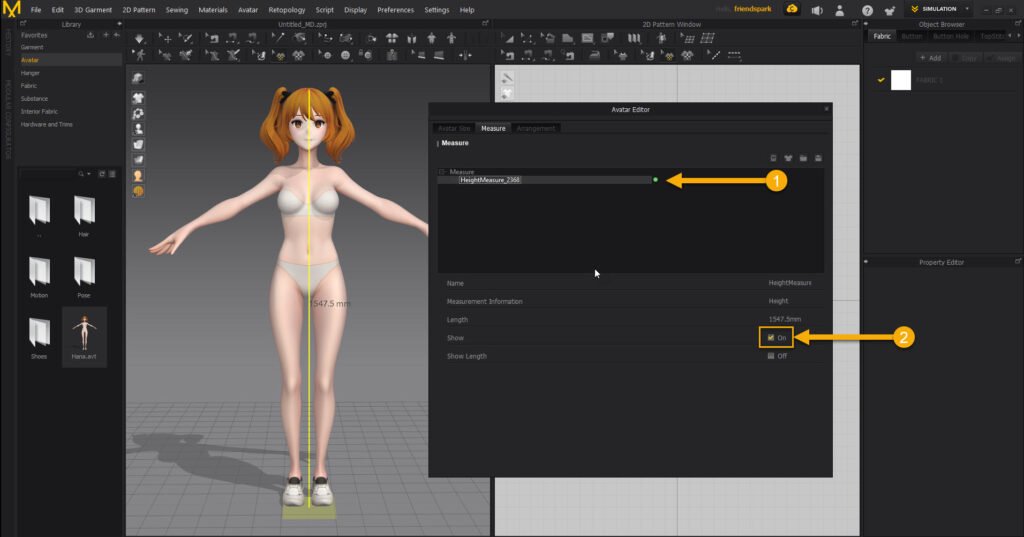
I know what you think…and the green light with the measurement?… We need to let Marvelous to do not show it…try this.
Avatar > Avatar Editor to get the below screen where will appear all the Measures, and you just need to select the one you want to not see on the screen then you will have the option to remove it from the list by clicking the “Delete” key on the keyboard or uncheck the “Show” option if you want to keep it.
Now we have ready our avatar then we proceed with its export.
Remember that it has a height of 1556.5 mm approx. Then, we export it as .obj to get it added into Zbrush. This intends to understand how the export/ import between these two tools works and how important it is to manage the size of our character.
File > Export (To get it all like the avatar, its hair, its shoes…)> OBJ … select the destination folder and get the below screen.

In the “Export OBJ” screen we are going to leave selected all the different components of the avatar (body, eye, eyelash, hair…), we are going to leave the units in mm and the size as 100% to have our full-sized character into Z and make the things easier.
Now we go to Zbrush to Import this nice avatar.
Once Z is open we insert one of the basic 3D Meshes that comes with ZBrush by clicking the big “S” (1) and selecting any of the ones available (2).
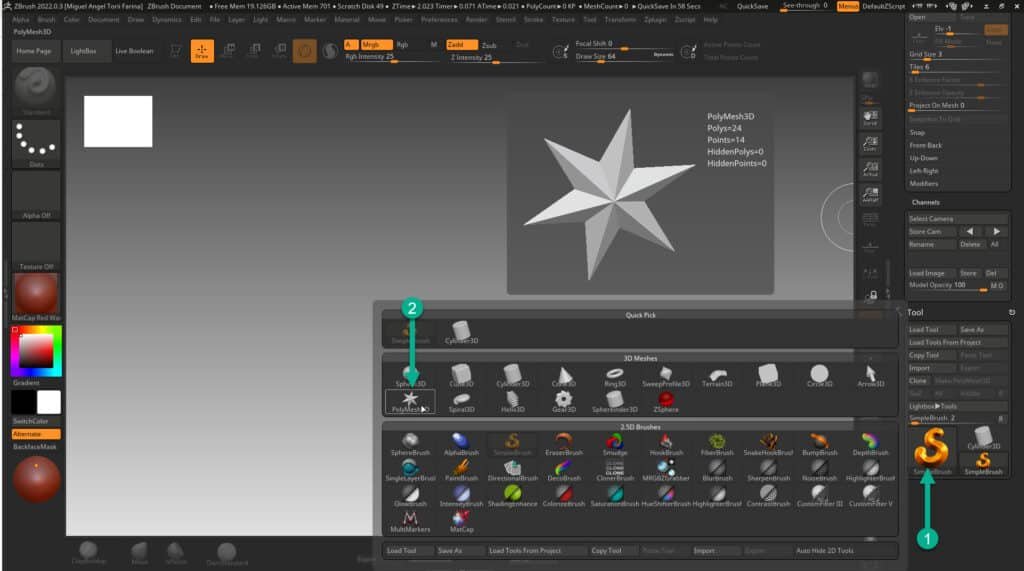
- Now we draw the 3D Mesh in the canvas just by dragging the figure while pressing the RMB (Right Mouse Button).
- Click on the “Edit” button to make it editable.
- Make Polimesh3D to get this finally malleable!
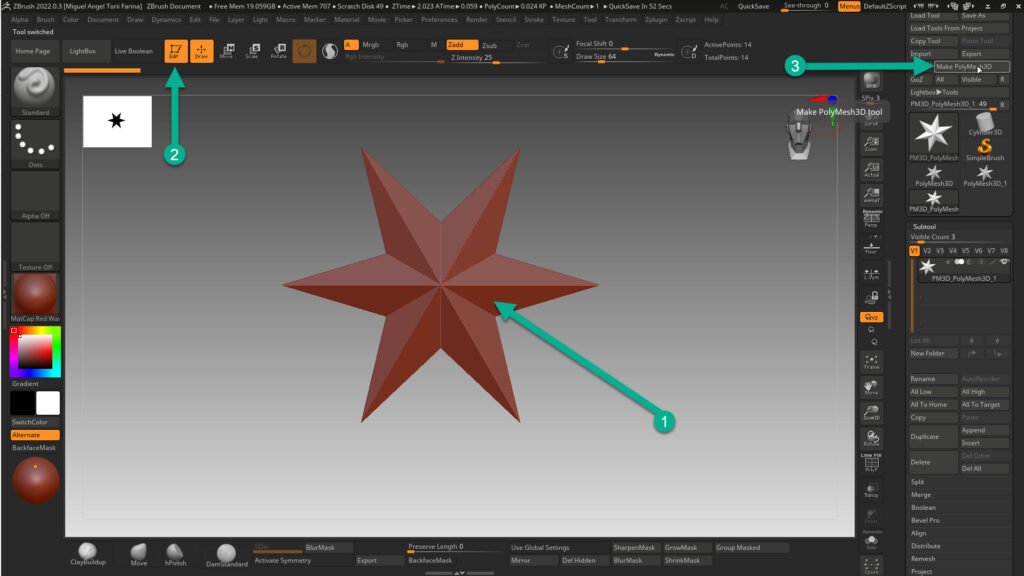
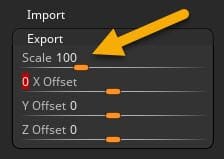
Now we can access the “Export” menu also accessible from the “Tool” panel.
This option is very important as it will serve for Importing and Exporting and at this point of the tutorial we will leave it as 1. This means that during the Import action the object brought to ZBrush will

Now we import the M avatar.
- Click on the “Import” button that is part of the “Tool” panel.
- Select the “.obj” created in the Export from Marvelous. This is the girl character.
- Pressing “Open” will trigger the Import.

The model has been finally imported, and we can see in Tool > Geometry > Size the height of the avatar in the Y-axis. This is 1578mm, slightly different than the Marvelous size as it includes this time, the hair.

Finally what we got is a model on a scale of 1:1 !! which is way too big, in fact when we press the Floor Button this appears in the canvas very tiny (Point 2 in the above picture).
As you already know, Zbrush requires to have two digits in the “Size” screen for each axis, therefore following this logic, this model requires to have 15.78mm of height instead of 1578mm, but… how we can do this?, well, we need to tell ZBrush that at the time to import something, this must be reduced by 100 times, and this can be defined in the Tool > Export > Scale field, with 100 as value.
Now is the time to import again the model, then we go to Subtool, select the girl-avatar and press Import from the Tool panel, select again the Marvelous avatar and Open it!.
- Now we can see in the Size panel, the result of dividing the original height of the avatar by 100. The model seems better about the ZBrush Floor, then looks like we have now the right proportions to work with Z.
- Another way to measure the model is by clicking the Scale and tracing a line between the foot and the top of the head, pressing the same time Shift Key to block the line 90 degrees with the floor.
- We can see in this point the measure before the reduction, what we could say, the real size of the model in case we decide to export it. This measure is directly connected with the variable Size in the Export panel, then it will change if this is also modified.

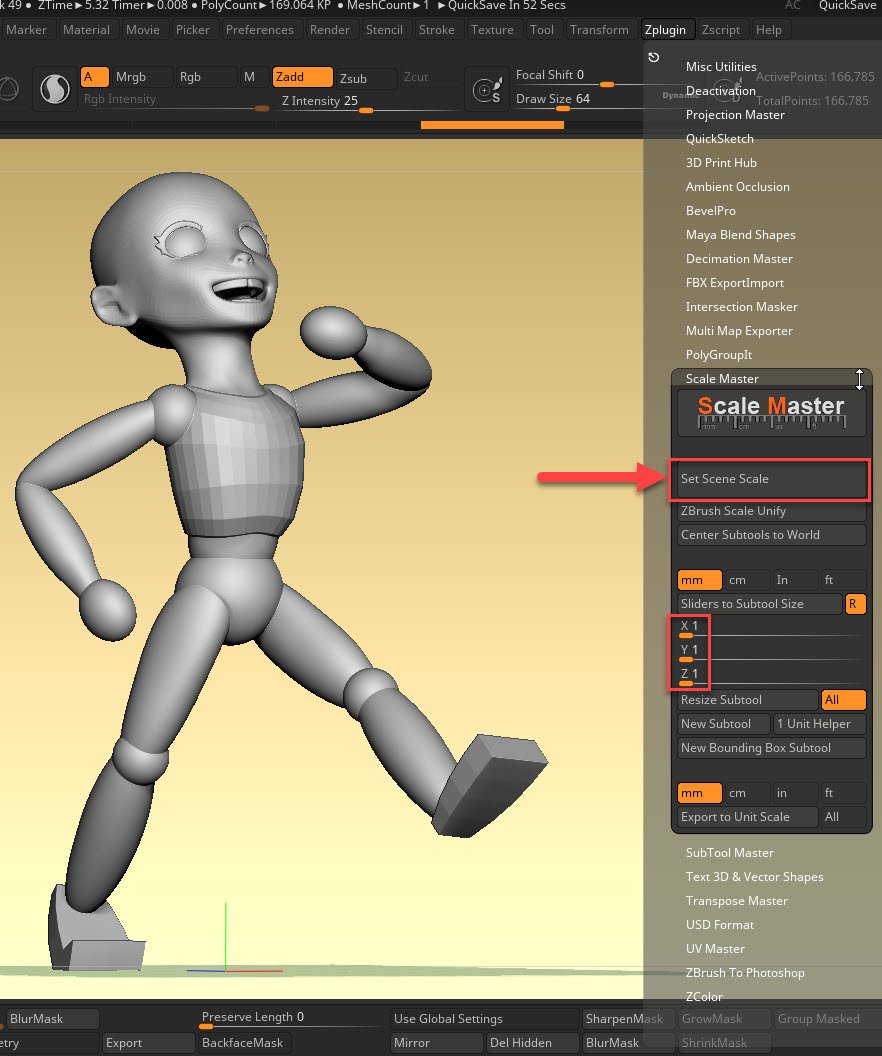
Another way to see the size of the model and also to declare the units of a particular Subtool is the option ZPlugin > Scale Master > Set Scene Scale.
In the below screen, we can see how the numbers match with the Marvelous ones as the avatar is all in one Subtool as it came merged from Marvelous. The Scale Master tool is also used to resize your model to an specific measure. We will do this later in this post.
The highlighted units are the ones ZBrush is using at this moment (mm).

In case you want to export something in a particular unit, different from the ZBrush defaults (mm), then you should merge all your Subtools in one (Tool > Subtool > Merge > MergeVisible) and proceed with the below options.
- The default Zbrush unit is mm then if we require to move the unit of our export into cm, then we need to select it.
- The button “Export to Unit Scale” is just exporting the selected subtool, that is why if you require to export through this option the hole character then you should merge all in one piece.
- The “All” option is basically to do the same but to all the subtools. This action will produce an “.obj” (in the selected unit) for each subtool (this is not what we are looking for).

In summary, once you are ready to export your avatar then we need to go to Zplugin > Scale Master, then select the units and click on “Export to Unit Scale”. This button triggers the screen for you to select the destination of the file on your PC and also the format of the mesh (.obj, .ma, .fbx, .x3d…). This option is needed in case you need the export in different units than mm or the ones you are using normally (in case you changed them at some point).
Marvelous recommends using an avatar with a length between 120cm to 200cm to get better folds, no blocky cloths, better topology, good arrangement points, and better simulation… many problems in general.
Point 2: My avatar is based on different Subtools and I want to resize it before the export
We go back to our avatar to put into practice what we have learned…
First, now we have clear that our character has to be at human-scale, therefore as I am doing a girl around 7 to 10 years then 1200 to 1400 mm is going to be fine (we will go for 1400mm).
Second, We know how to measure our character in different ways, knowing which refers to the size after importing and the size in the canvas. We also know when the tools are showing me the size of the subtool or the character in general.
Third, We are more familiar now with how to locate the avatar in Marvelous and how to export it to Zbrush knowing forehand the size of it.
Fourth, We know that Zbrush prefers two digits in “Size” … then we are going to achieve a height of 14 in Z and define also in the “Export” the value 100 to multiply by this our 14mm avatar during the export. In Marvelous this will be 1400mm!!.
We are going to have a look at our model.
- Now we know the Size describes the measures of the subtool, not the hole mesh you see (in the below picture is the chest of the subtool selected), therefore this option is not useful to me to get the real character size…but it will be when merged…
- A quick way is to select “Scale” tool, uncheck the Gizmo 3D and drag a line with the mouse pointer from the floor to the top.
- We can see in the Left-Up corner the approximation of the height…1091 mm.

Our character is 1091 mm in size and we want it as 1400… we can play with the Scale tool selecting all the subtools…but it’s not as accurate and easy as the below way… a technique that you can use for many other purposes.
This method is based on the use of “Transpose Master” to get a clone of our avatar in low resolution, then scale this with the Scale Master option as it’s all one piece, and finally move those changes to the independent subtools.
We proceed to use the TPoseMesh from Transpose Master that you can find in the Zplugin section (this comes by default with ZBrush).

- Our model, which was based on different subtools, is left aside.
- There is a new model in the menu, presented on the canvas, which is low res and all in one subtool divided by playgroups, one for each subtool from the original model.

Now we have a look at Scale Master… and we can see that Zbrush indicates no initialized values for the three-axis, then we press the Set Scene Scale to define the scale we are looking for.
In the below picture, we see the different options in units, and we go for the mm ones…

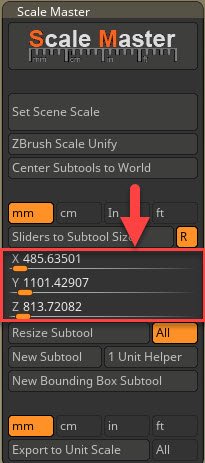
If we go back to the Scale Master after defining this, we can see the new measures!! and we can proceed to click into the 1101.42907 value and change it to 1400mm. The other two axis will be readjusted automatically to follow the new change over the “Y”. The Geometry > Size panel also give you these measures, but they are not interconnected to each other then you will deform the model if you try to do the same from this panel.
Once we change it in the above picture we have to press the Resize Subtool button to apply the change over the model as we can see below.

Now Scale Master will show the new measures!

It is time to apply the changes done over the low-res clone to the original one, based on subtools.
We go back to Zplugin > Transpose Master > TPose|SubT. By clicking this button you will trigger the transfer of the changes.

The below message appears when the change is done.

- The low-res model will remain in our tool list.
- the original one is now on screen and the subtools are now placed in the subtool panel.
- the Scale is telling us the model is now 1400mm as we were looking for.

Point 3: What is the polycount of our model?
We are finally ready to export the model to Marvelous….but what is the polycount of our model?.
The intention of all of this is to model clothing for the character, therefore we are looking for quick real-time renders from Marvelous, and this requires getting things as easy as possible for the program to move the avatar, which means fewer polys (Polygons), as it is very noticeable the effort for Marvelous to move something heavy… someone could raise the discussion to consider also the features of the machine when we talk about real-time rendering, but it is not really needed…as a dense model is not making any difference to the final quality of the cloth and its simulation as long as your model is rounded enough to not force the fabric to adopt strange shapes, therefore if we follow this strategy we will have more resources to deal with the clothing simulation when we reduce the particle distance, that requires a lot of machines.
If we have a look into the model we can see we have in total 5.275 Million polys!! which is a lot!!.
How do I know my polycount?
It is normal to believe the polycount is the one we have by default in the top right of the Zbrush screen…but is not…that is the Active Points we have in our model…
In my avatar we have… ActivePoints as 94.210 corresponds just to the Subtool selected, and TotalPoints as 5.275 Million is the result, of adding all the Active Points from all the Subtools we have in our Tool (the girl character).

The best thing to understand this forever is by using a simple example
The below cube is the unique Subtool in our new Tool, and this is why ActivePoints and TotalPoints match. They are 8!!…but a cube has just 6 polygons (6 squares)…therefore it’s clear now that Active points mean vertexes!!.

Now it is more clear…but to complete the explanation we need to know where the real polycount is in ZBrush.
Option 1: Use the mouse pointer to click and hover the Subtool from the list…

Option 2: Accessing Preferences > Misc > ActivePolygons… we can see how the “Total Polys Count” seems does not work.

In Summary, now we know where to find the Polycount… and also that to get the Total Polycount we would need to merge all our Subtools (Subtool > Merge > MergeVisible) as it seems just available the local Subtool count is.
Another point to consider is how close are in number the Active Points with the Polygon Count …but this is just when we work with squares in our meshes. In meshes with triangles, the distance between these guys goes crazy.
Our character is based on squares (quads) then we will consider the Active Points to define how heavy the model is…
Now we move all the Subtools to their first or second Subdivision to reduce the model polycount and I will MergeVisible for you to observe the results and the comparison between ActivePoints and ActivePolygons.
Here we have that we finally have just 169K ActivePolygons vs 166K ActivePoints. This demonstrates there is not a big difference between them (in the quads field), but look at the good news!!, we have now reduced from 5.2 Million to just 166K Active Points. Marvelous will please this change and we will do it also.

Point 4: My avatar is not fitting properly into the Marvelous grid.
Time to export the avatar to Marvelous.
We can use the already merged model to get the .obj and we have three export buttons that will get the same output.
Option 1: Tool > Export

Option 2: Tool > Select Tool and Right Mouse Click > Export

Option 3: Scale Master > Export to Unit Scale (mm as default)

We select one of the above options and name it as M_Avatar_Final for example, and now we go to Marvelous Designer to import it.
File > Open > Avatar.

We press OK as the units are in mm as in ZBrush and the scale is as expected…100% which will be our 1400mm avatar.

- We found the character is not over the Marvelous floor grid.
- It seems we have 696.6mm of the body underneath the grid (Our character is 1400mm then seems to be near half).
- We see also the 2D Pattern Window shows our character, not in the centre.

We need to go back to ZBrush to get this right.
We need to go to Tool > Subtool > Position to find the coordinates of our character in the space and as per in the below picture we see the X, Y and Z-axis are not 0.
The X-axis moves the character left (negative values) to right (positive values), and then moving it to 0 will allow us to work in symmetry.
The Z-axis moves the character forwards (negative) and backwards (positive) and we want it in the middle of the scene then we also define it as 0.
The Y-axis moves the character up (negative) and down (positive) and it seems that if we go for 0 as the other two, the character will remain half down the grid… If the girl is now 1400mm then it seems we need to move half up (negative)…then -700 will do the work…but remember our numbers in Size are 100 less than the real ones, then will be -7 instead of -700
To get this done we need to use once again the Transpose Master tool from Zplugin…clicking into TPoseMesh we have back our clone on screen.

Tool > Subtool > Position tell us the current position of the character.

We apply what we were planning to do (X=0, Y=-7, Z=0) and we imported the marvelous avatar into Z to see if we did it right.

Now is the time to proceed with the transfer of the coordinates to the original mesh through the well-known Transpose Master > TPose|SubT.

Now we have corrected the position to match with the Marvelous requirements and also if we had symmetries issues when modelling, this was also fixed as the X coordinate is now zero.

Time of Exporting again!! 1. We Subtool> Merge> MergeVisible and we File > Open> Avatar the .obj into Marvelous.
We can see how our avatar is set into the Marvelous floor (1), the height measurement is correct (approx 1400mm) (2), and the figure in the 2D Pattern Window is almost correct (3),… it’s a bit to the right but it’s OK as the model is not symmetrical but is centred. We will sort this out in a future post where we will explain how to move the character into T-Pose just for Marvelous workflow by using Morph Target from Zbrush.

Point 5: My avatar is not in T-Pose
This is a very interesting point as includes some of the uses of the amazing tool “Morph Target” that combines very well with Marvelous.
We will get this in our next Post.
Thanks for reading.

Miguel Angel Torio
HandyTales Founder & CEO


123win44 has become my favorite online casino. The promotions are regular and the platform user-friendly. Worth a try! Start Winning Now with 123win44
Anyone looking for a quick download Seriously, 8800betdownload is surprisingly fast. No random redirects, just the file you need. Definitely saving me some time and headaches. You should try it: 8800betdownload
30winbet… hmmm, it’s alright. Nothing that’ll blow your socks off, but it gets the job done. Worth a look if you’re browsing around. Find it here: 30winbet.
Ok, 99okbet seems like something that could be good. Going try it out to see what the buzz is. Good selections of games and hopefully and a good payout. 99okbet
Heard a lot about 69pkr, finally checked it out! Not bad, pretty decent selection of games. Worth a look if you’re bored. Check it out here: 69pkr
Ace291 is cool. It’s got more modern look and feel. I’ve been playing it for a while. You must have a look at: ace291
Dream92game is pretty interesting. The graphics are nice. Can’t complain much honestly. I had a pretty positive experience with this one. Visit the website: dream92game
Hey guys, been checking out whinph lately and it’s pretty solid. Easy to get around and the games are fun. Give it a go! Here’s the link to whinph
26superph is where it’s at! Got some serious wins there recently. Luck is on my side, or maybe it’s just a great platform. You decide! 26superph
Just wanted to shoutout 92gamelogin! Quick and easy access to all my favorite games. No hassle, just straight to the fun. Give it a look see! 92gamelogin