Tips, Plugins & Shortcodes
Handy 3ds Max

Tips, Shortcuts, features and procedures that we normally use when working with this awesome tool.
It has happened to us many times that we spend long periods working on a project that requires another program and when we jump back to 3DS Max we need to take a look at our notes to quickly roll over the application again… we will try to gradually include a list of tools, plugins and shortcuts to create this notebook that can quickly get us out of trouble and also to bring some help to those starting with this software.
Official Link from Autodesk: Default Hotkey Maps | 3ds Max 2022 | Autodesk Knowledge Network
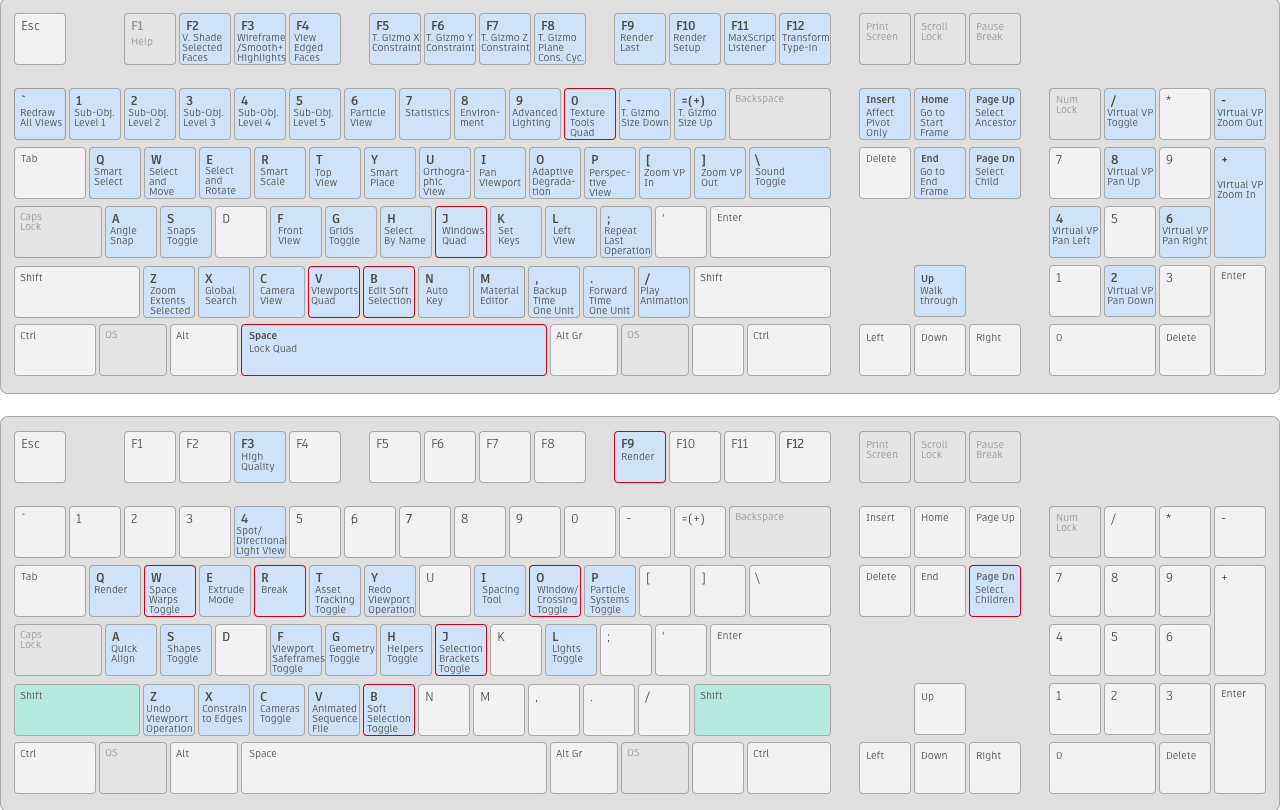
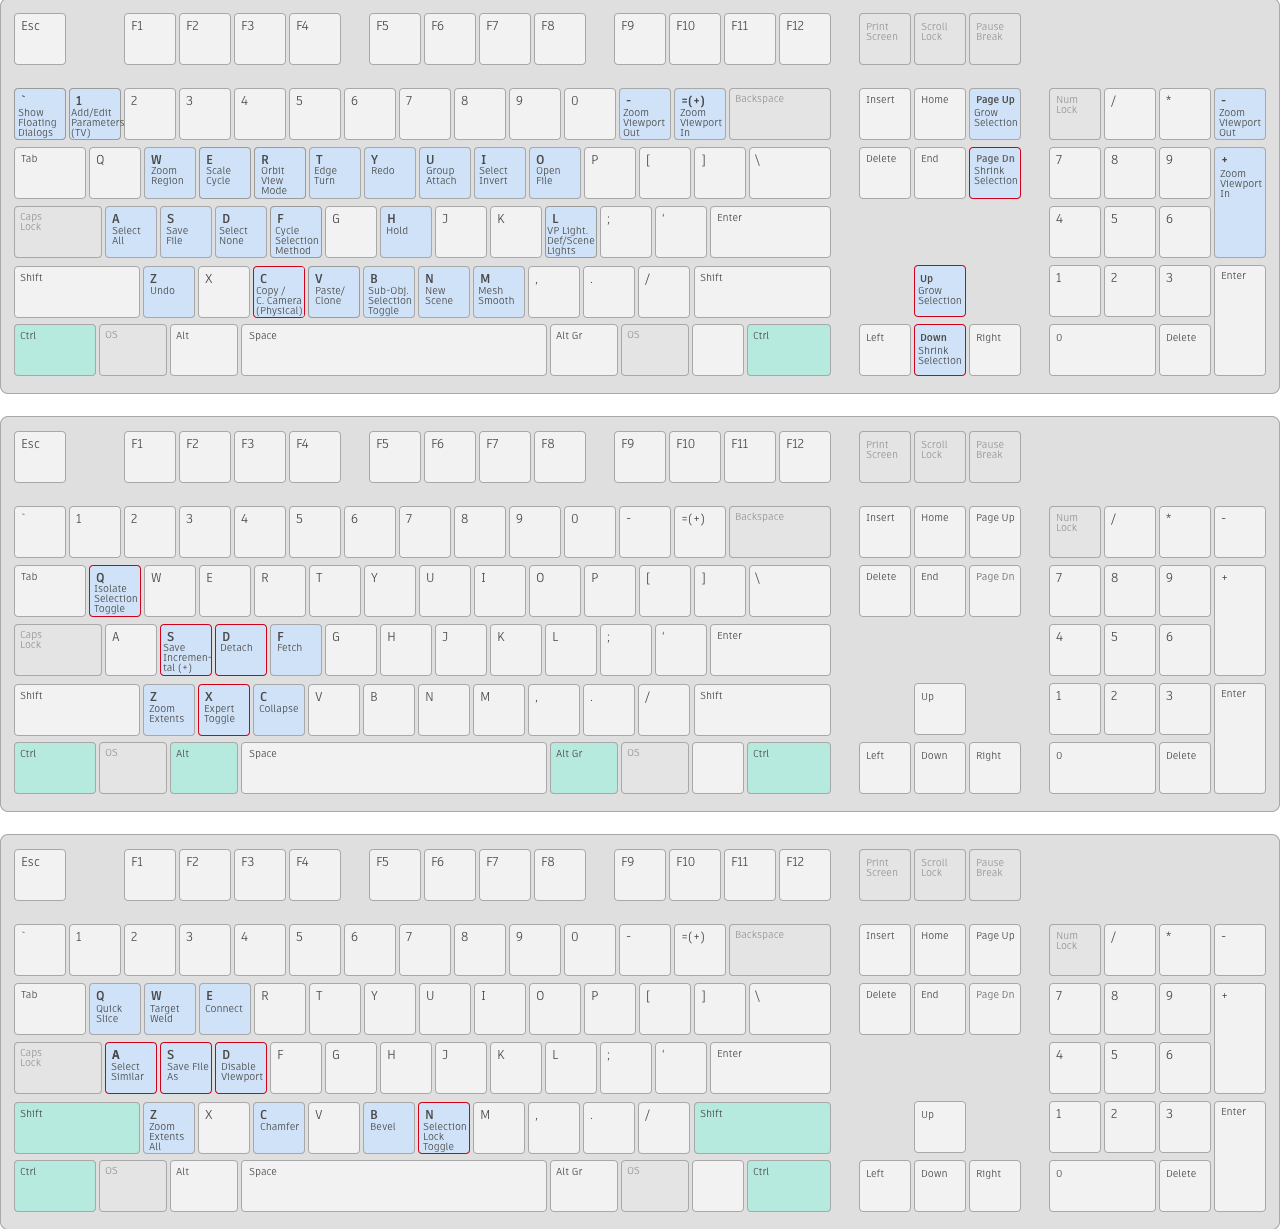
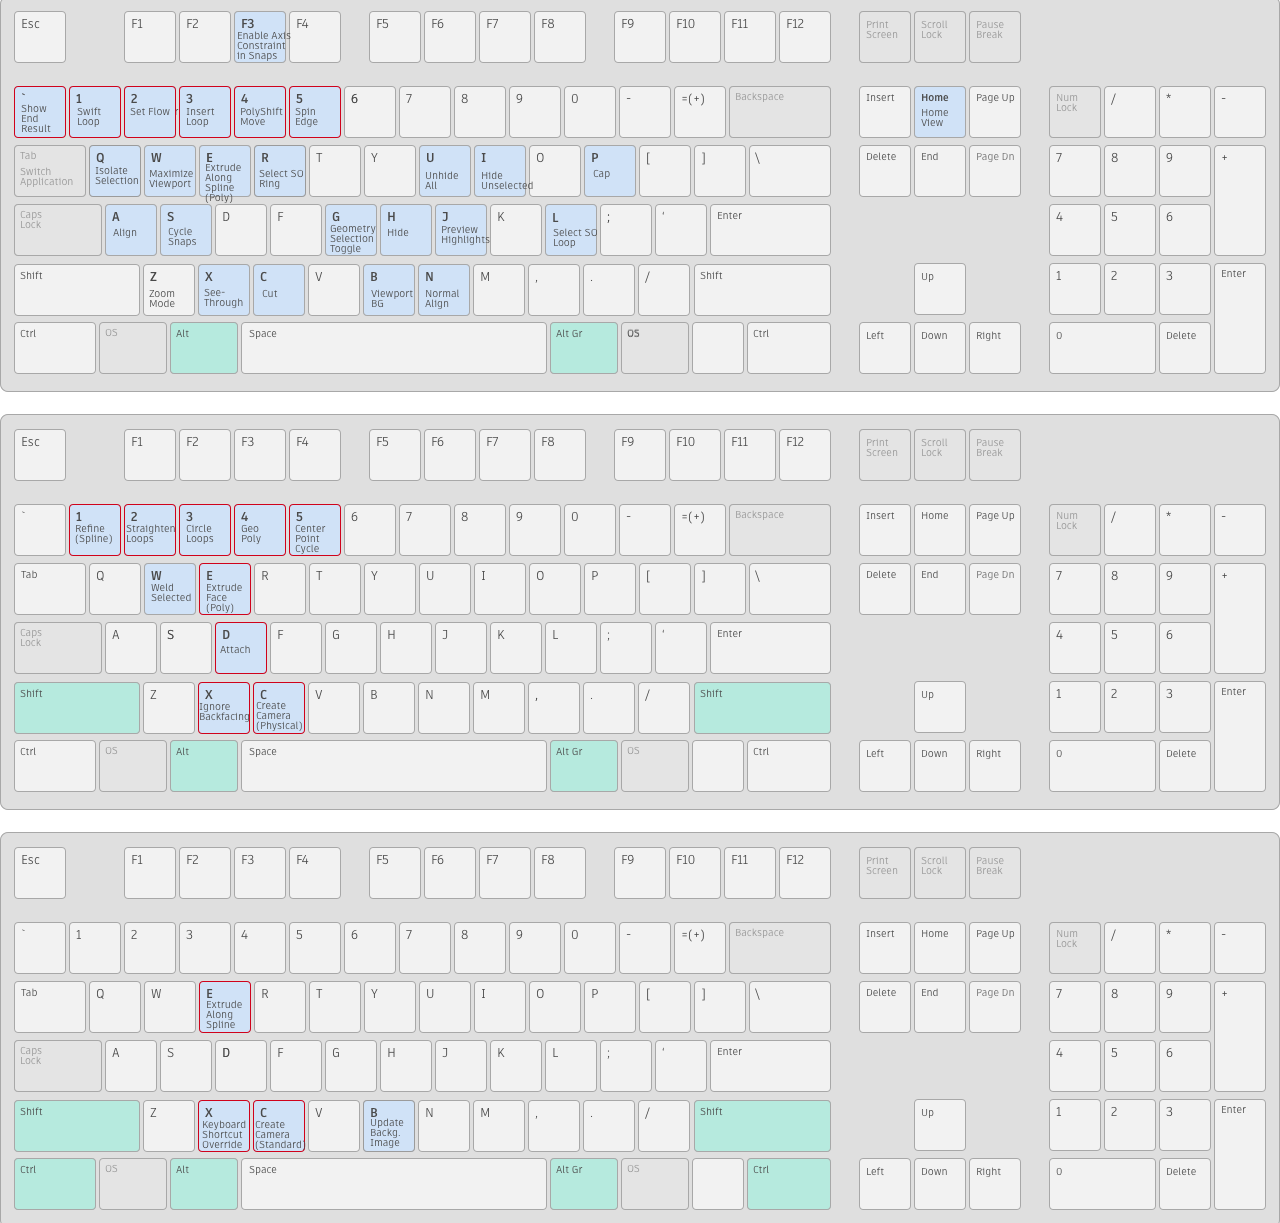
▶️ Shortcuts for UI & Modeling
▶️ Shortcuts for the day to day
☑️ Select the view you prefer and click Alt + W to make it your main canvas.
☑️ Looking around the object: Alt + MMB (middle mouse button).
☑️ Smooth Zoom: Alt + Ctrl + MMB (moving forward & backwards)
☑️ Pan Hand Tool: MMB
☑️ Perspective / Orthographic View: P / U
☑️ Top View: T
☑️ Make visible just selection + Cameras + Lights: Shift+G
☑️ Bring selected object to scene: Z
☑️ Hide the Grid: G
☑️ Vertex, Edge, Border, Polygon, Element: Within Edit Poly… 1, 2, 3, 4, 5 respectively.
☑️ Environment Tab: 8
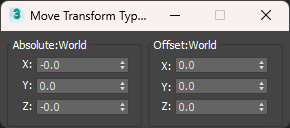
Move Tool: W …by clicking over with the RMB twice you can control the move with the below panel.
Rotate Tool: E
Scale Tool: R
Selection Tool: Q (Change selection by pressing more than one time)
Crossing Selection Tool: Shift + O (Select more than one object or just one can be selected)

View Angle: Ctrl + W (LMB and moving the mouse backwards and forward)
Snaps Toggle: S…If you move the object and does not snap to the point you want, remember to right-click this icon to ensure the current snap configuration.
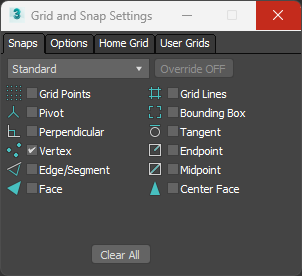
Snaps Toggle + Holding the LMB: Getting the options to snap in the X, Y, Z (3D) or just in the 2D world (X, Y).
Angle Snaps Toggle: A
Material Editor (UP Icon) or Slate Material Editor (Down Icon): M (Toggles a dialogue for creating and modifying materials and applying them to scene elements). The M shortcut will trigger the option that is selected at that time.
Render Configuration: F10
Render: Shift Q/ Shift F9
▶️ Some Tips..
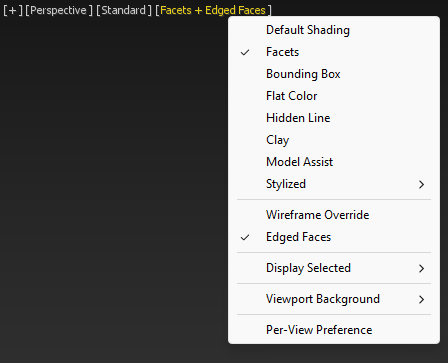
Tip 1: Running the Viewport in Standard mode, does not project shadows and does not impact the performance.
Tip 2: Facets will allow you to see volumes without the shadows, and Edged Faces will show you the wireframe of the meshes.
Tip 3: Enable Auto Backup for around 20 min. Customize > Preferences > Files > Auto Backup & Backup Interval
Tip 4: Increase the Scene Undo Backup to get at least 50 times the option to be able to perform Ctrl+Z. Customize > Preferences > General > Scene Undo: Levels
Tip 5: Max will know where the object’s textures are if they are in the same folder as the related object. In case the textures are based on their own folder, we need to tell Max where they are by adding the texture’s full path to the project path list.
Customize> Configure User Paths… > External Files> Add… > Paste your texture’s path (check also the option Add Subpaths if there are folders within the texture’s folder for them to be also considered)
Tip 6: Duplicate any object just by pressing Shift and drag from the object that needs to be duplicated. Select Copy from the Clone Options screen that will emerge.
▶️ Basic Operations
☑️ Changing the pivot: Remember to check for the Snap Options to make the relocation easier.
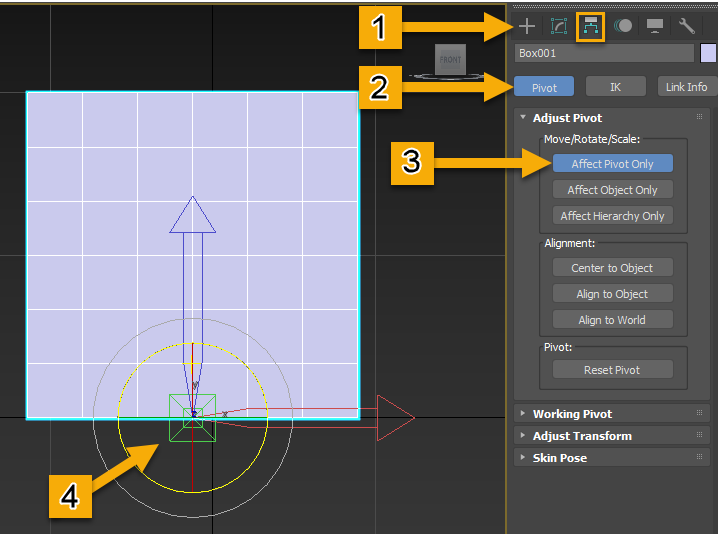
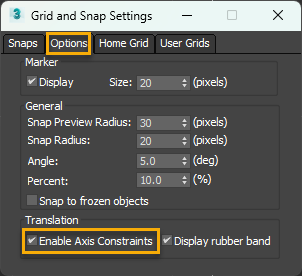
☑️ Align the Spline: Remember to select the Snap option + RMB and to toggle in Options the Enable Axis Constraints to make this possible. Remember to drag from the arrows to the desired reference point with the LMB.
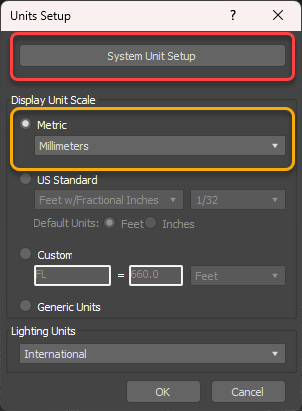
☑️ Selecting Display & System Units: Customize > Units Setup. We use millimetres in both.
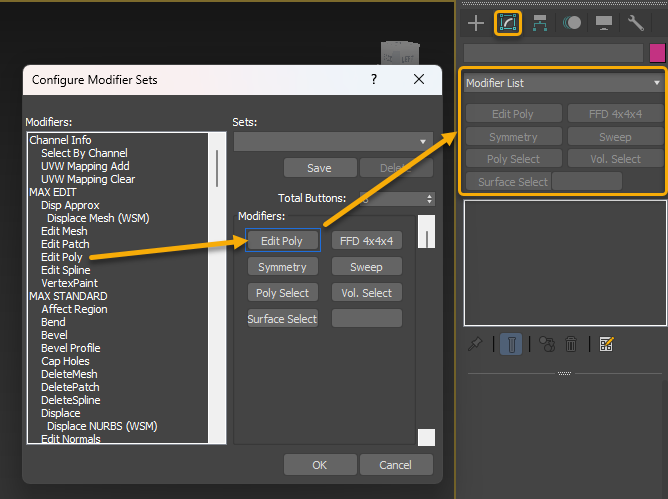
☑️ Configure Modifiers Sets: Right Click over Modifier List, check Show Buttons and open the Configure Modifier Sets to configure your own panel.
☑️ Show the Scene Explorer (Outliner in Maya): Select the below icon from the top panel.
☑️ Make it transparent-frame: RMB over the object and select Object Properties > Display as Box.
☑️ Adding Mouldings/ Skirting Boards: Trace a Line along the place you want to have these artefacts, then once completed apply the Sweep Modifier over the line and select your custom spline. Remember to uncheck the Smooth Path to get better results in your render. Remember that in case the section is bigger than required, we would need to resize the spline model and hit Reset XForm. It will require to apply it again over the line profile (Section Type> Use Custom Section).

▶️ Some Plugins
Corona (Render)
Converting models to Corona: In case we have models that are, for instance, ready for Vray we can convert them to be ready for Corona by running the below script.
Scripting> Run Script… > CoronaRenderer and coronaConverter_v1.42.ms. We need to press START CONVERSION (Remember to select “switch render to Corona). After the Conversion click within the same screen (Tools Section), Reset MatEdit to CoronaMtls.
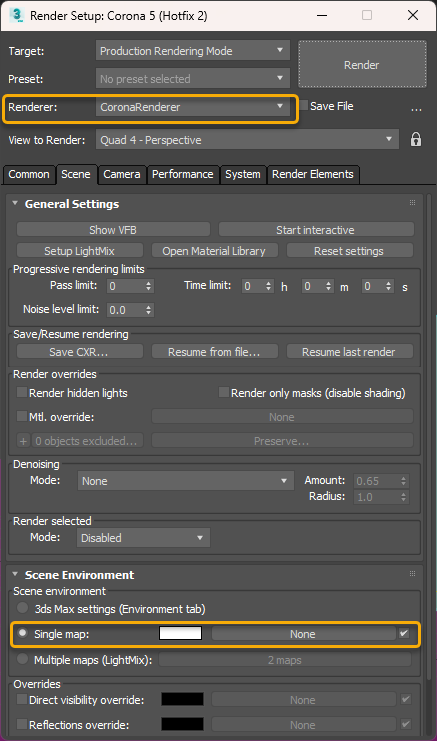
Selecting Corona as our Render choice: Remember to select Corona as the preferred Renderer.
Selecting Lighting method: Corona Sky (Sky map) + Corona Sun.
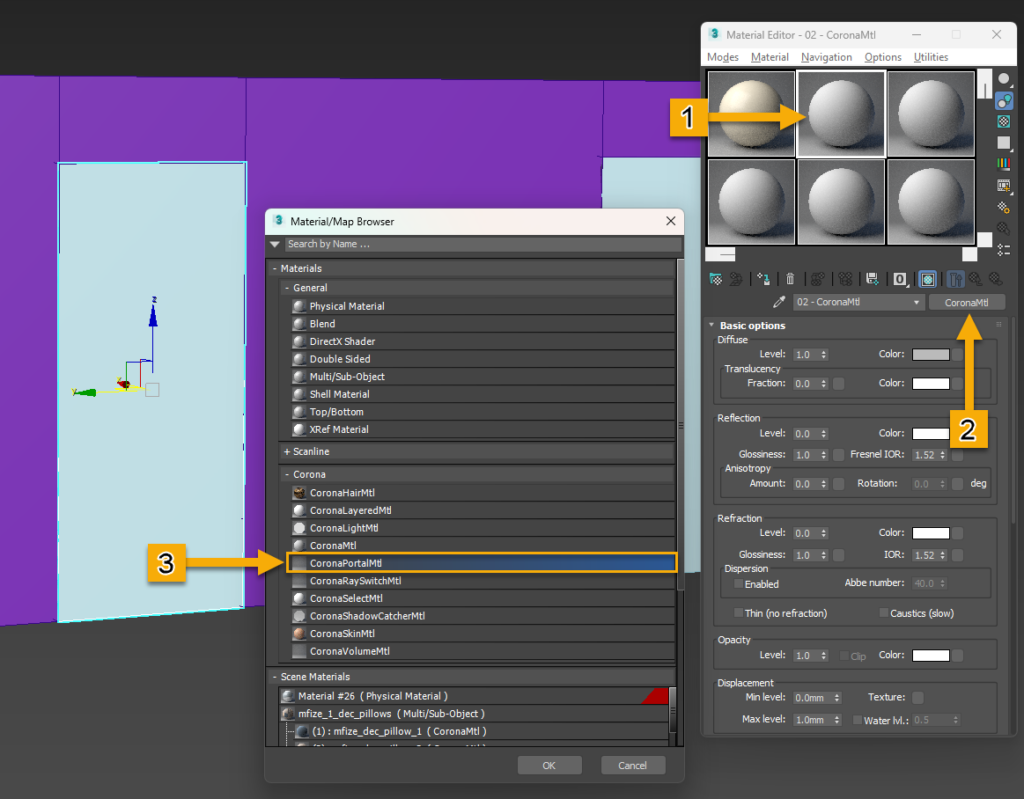
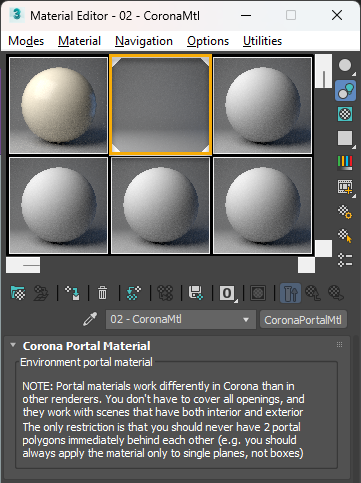
Creating Portals: We use portals in our Light inputs in our Visualizations to direct more light inside the rooms and to benefit render times. These portals are basically planes that fit perfectly in the outer section of the wall where the windows are located. The plane does not have subdivisions and we assign them the CoronaPortalMtl material by dragging the material to the plane.
Setting the GreyMat: By using this technique we will comprehend how light is affecting the interior and then keep correcting some parameters to adjust the Corona Sky, for said purpose we define a new material with grey as color (128 for RGB) and we assign it to Mtl. override. We need to exclude from the GreyMat the portals and the windows by adding them to the Objects Excluded/ Included List.
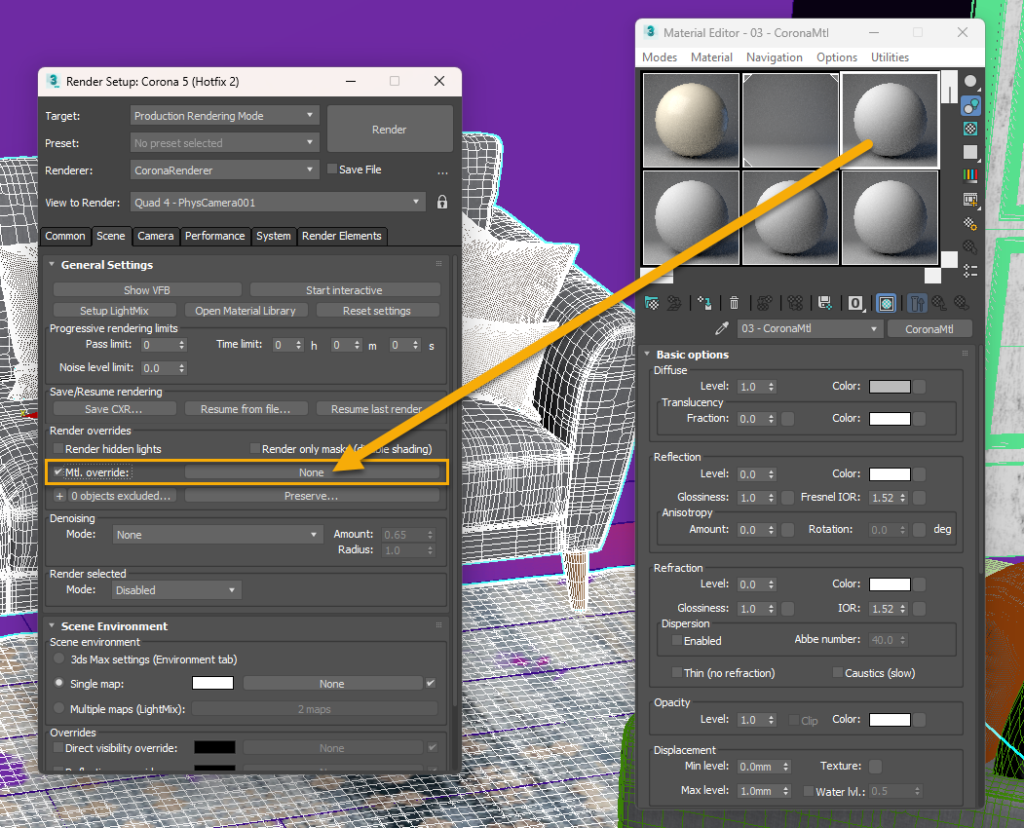
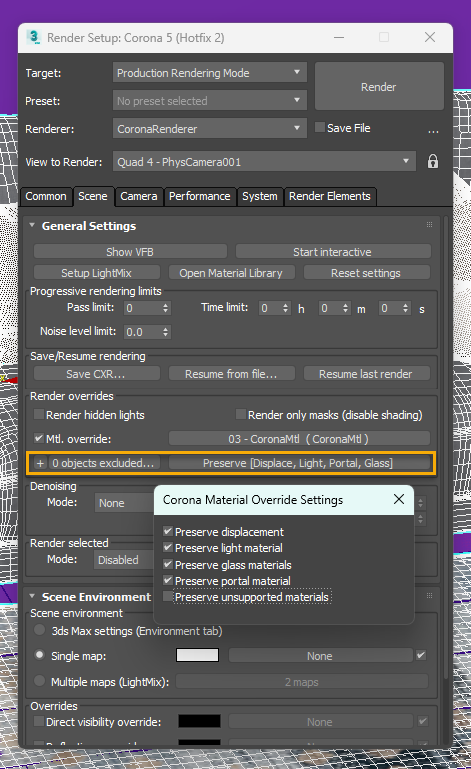
One way to add objects to the exclusion list is to select the object and click the Plus symbol (+) that is within the above yellow section. You can also maintain the list by opening the Exclude/ Include panel (toggle at the right side of the (+)).
Corona has some Important Features within the POST tag (TONE MAPPING) and despite Corona orienting these options in a more artistic aspect it is important to know the intention behind the term.
☑️ Exposure: The amount of light that reaches your camera’s sensor, creating visual data over a period of time.
☑️ Highlight Compress: Increasing it reduces the effect of burning in brightest parts of your image – this is useful for example if you want objects behind the window to be visible on a sunny day. There is no “correct value” for highlight compression as it has purely artistic value. Usually, there is no need to increase it above 2-5 but in some cases, you may even want to increase it to very high values like 50 or more. (https://support.chaos.com)
☑️ White balance (K): place where the user sets the exact Kelvin temperature…(3000 Tungsten, 4000 Sunset, 5000 Noon, 6500 Daylight, 7000 Overcast, 9000 Blue Sky)
☑️ Green-Magenta tint: Positive values [0.004, 1] will tint slightly the render with green, and negative values [-1, -0.004} will pinkish the ambient.
☑️ Contrast: The range of brightness, from lightest to darkest, in an image. A high-contrast image will have very bright highlights and very dark shadows.
☑️ Saturation: The brilliance and intensity of a color. When a pigment hue is “toned,” both white and black (grey) are added to the color to reduce the color’s saturation.
☑️ Filmic highlights and shadows: Adjust the tone mapping via Highlight Compression for a subtle highlight compression without loss of color saturation, and Rich Shadows to control the richness/saturation of shadows in the image.
☑️ Vignette intensity: This feature will darken the corners of the render.
☑️ Color tint: This option allows you to tint the render with an specific color.
☑️ Curves: This option allows you to adjust points throughout an image’s tonal range. Initially, the image’s tonality is represented as a straight diagonal line on a graph. When adjusting an RGB image, the upper-right area of the graph represents the highlights and the lower-left area represents the shadows. The horizontal axis of the graph represents the input levels (original image values) and the vertical axis represents the output levels (newly adjusted values). As you add control points to the line and move them, the shape of the curve changes, reflecting your image adjustments. The steeper sections of the curve represent areas of higher contrast while flatter sections represent areas of lower contrast.
Corona Sun: whenever we do not use Overcast lighting we will also use the Corona Sun…
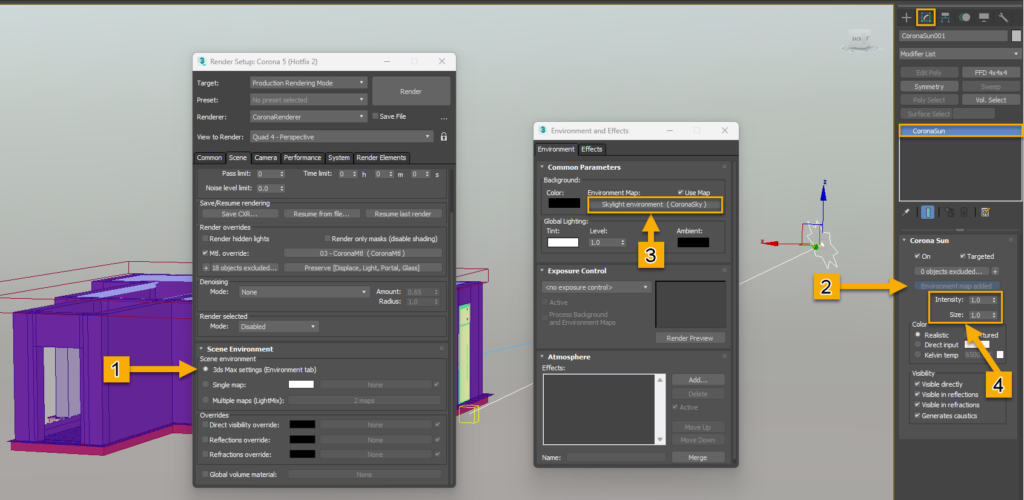
Position the sun and then select “Use 3ds Max settings” (Environment Tab) within the Scene environment of the Render Setup window.
Open the Environment and Effects screen (shortcut “8”) to verify the Skylight environment (CoronaSky) is selected in the Background after this has been toggled from the CoronaSun Modify panel as per the next picture. Time to play with the Intensity and Size of the sun where 1.0 is the maximum value for Intensity and it is preferable to go for values between 0.2-0.3. The size of the sun will soften the shadows as long its size grows.
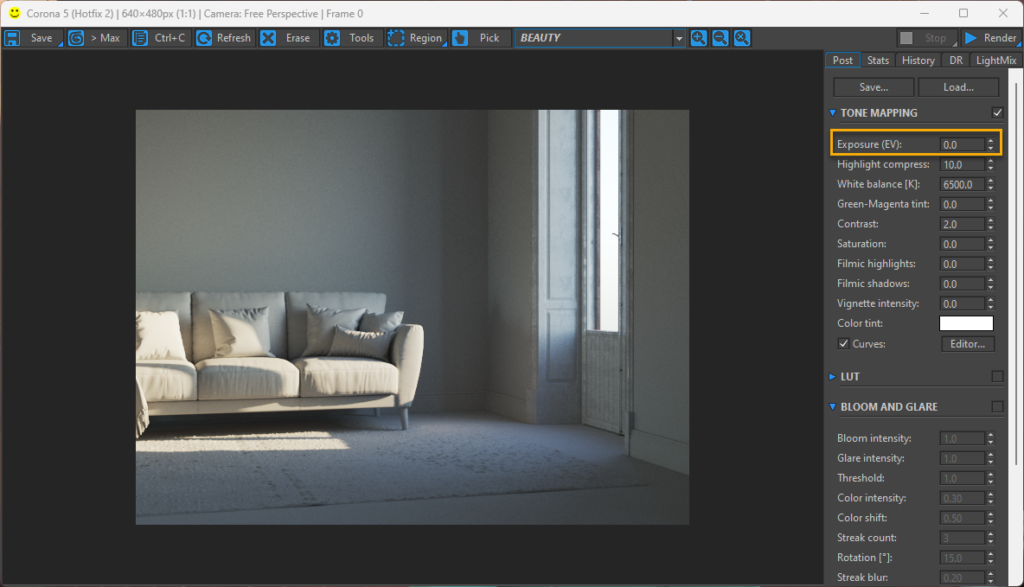
The Exposure can be 0.0 and we need to remember that the light will have different temperatures depending on the position of the CoronaSun. In the above render, the sun is getting closer to the Sunset, which is the reason to have a yellow tint over the graymat scene.
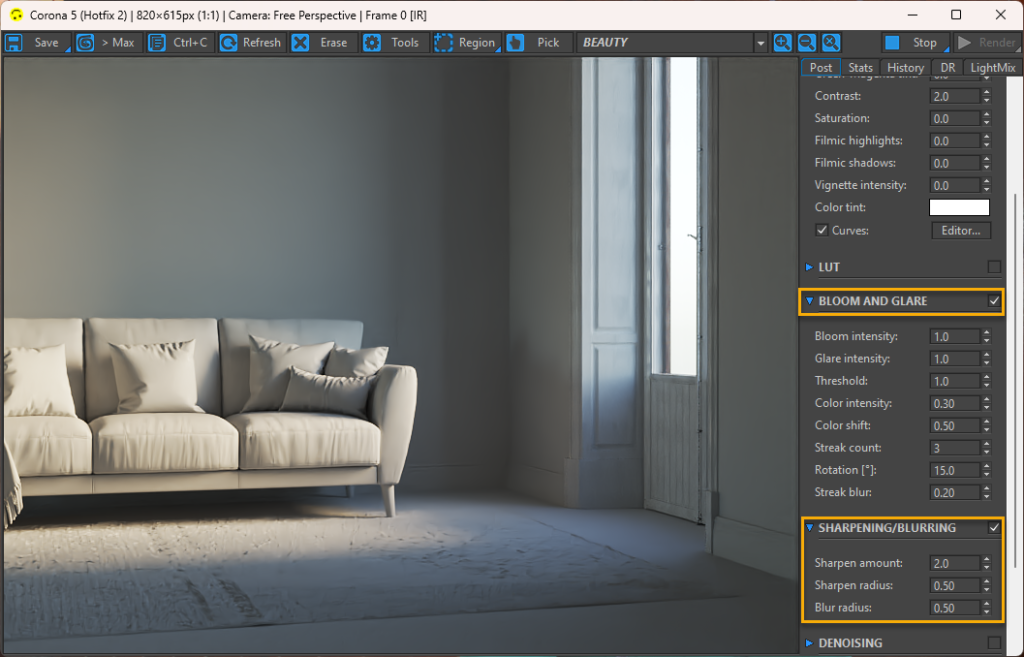
Adding Sharpening, Bloom and Glare plus softening the shadows and increasing direct illuminated area by increasing the sun size from 1 to 50.
Light Mix: This is a way to present the Corona Sky and Corona Sun to be manipulated easier.
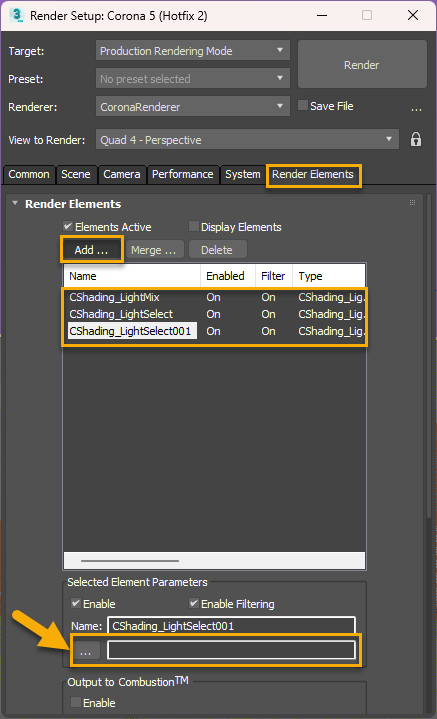
Adding firstly in our Render Elements list (Render Setup panel) three elements…CShading_LightMix, CShading_LightSelect (this will be our sky) and another CShading_LightSelect (this will be our sun). Remember to empty the path field we have under Name (yellow arrow).
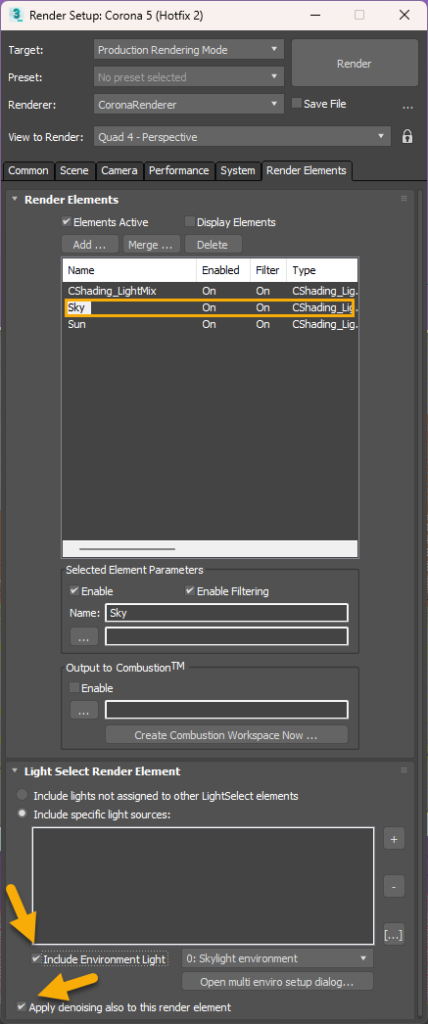
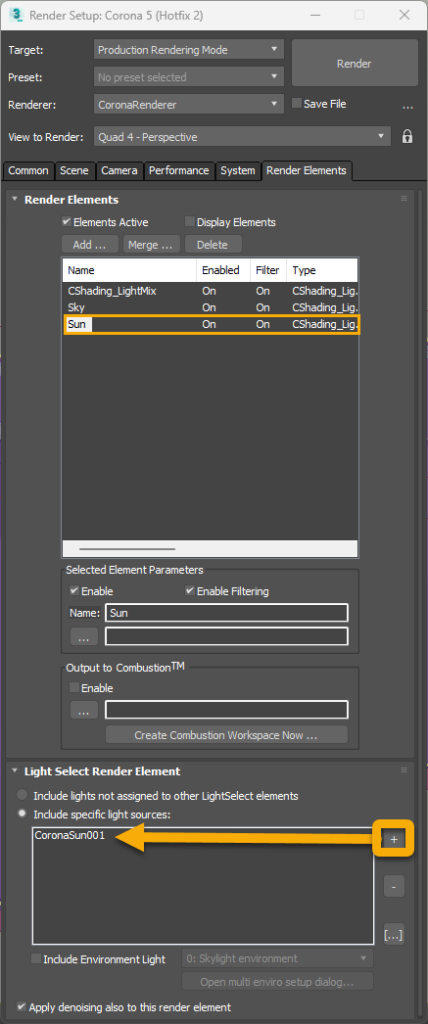
Rename one Render Element as Sky checking the “Include Environment Light” and “Apply denoising also to this render element” and the other one as Sun selecting also “Apply denoising also to this render element” and click your sun and click + to be added in the “Include specific light source” list.
…denoising? : helps to significantly reduce render time by rendering with fewer samples. It uses Open Image Denoise, which transforms noisy images into clean images with machine learning.
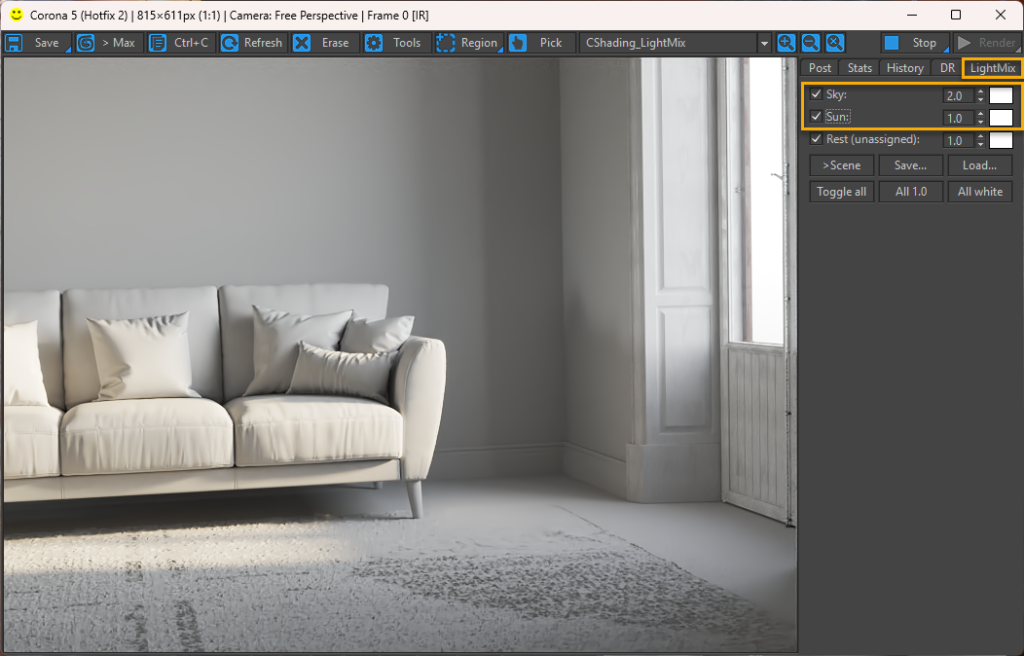
Now we have in the LightMix our Sky and Sun to play with!!
Saturate/ Desaturate Skymap: We can modify the Skymap by linking it as instance with a new material within the Material Editor and then be able to simulate all types of environments (making it white for Overcast and blue for Sunny pictures).
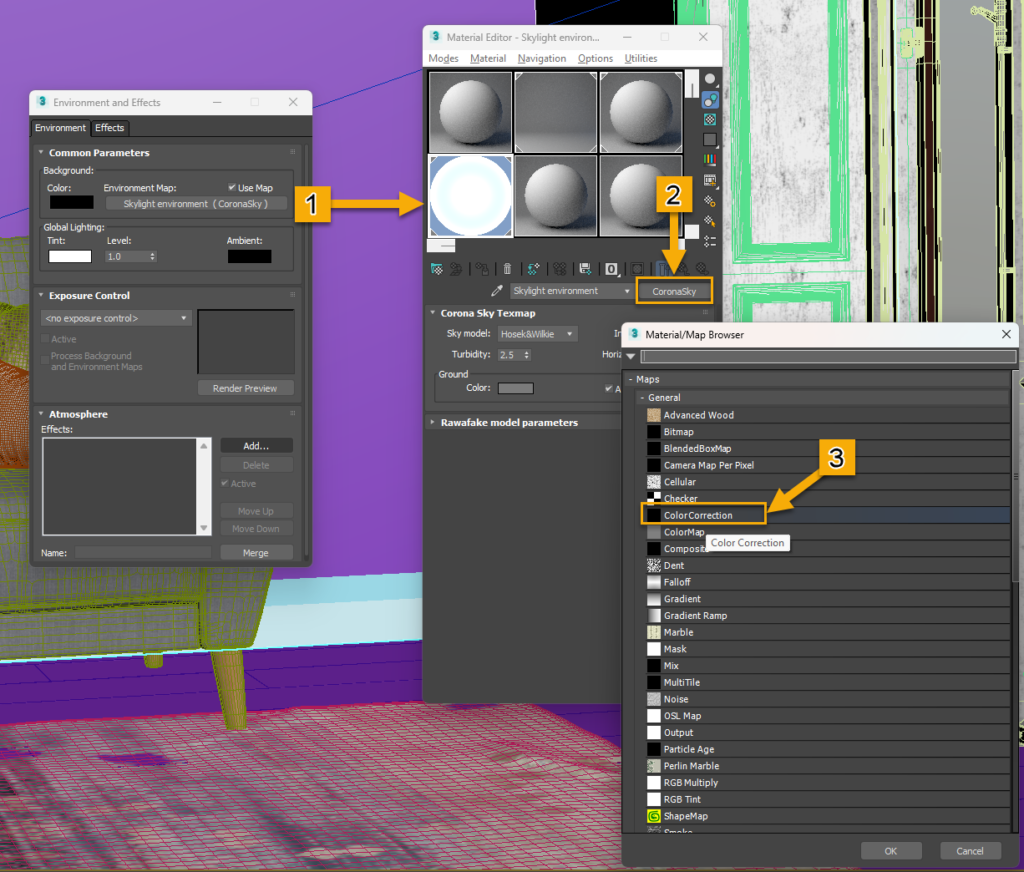
We drag the Skylight Environment to one of the no-assigned materials and we get our sky…click in CoronaSky and add the Color Correction map (Keep old map as sub-map) and move Saturation to a value around -80. This will be a good value to simulate Overcast weather.
Artificial Light: We can add artificial light in Corona by adding CoronaLight shapes or applying light to specific meshes.
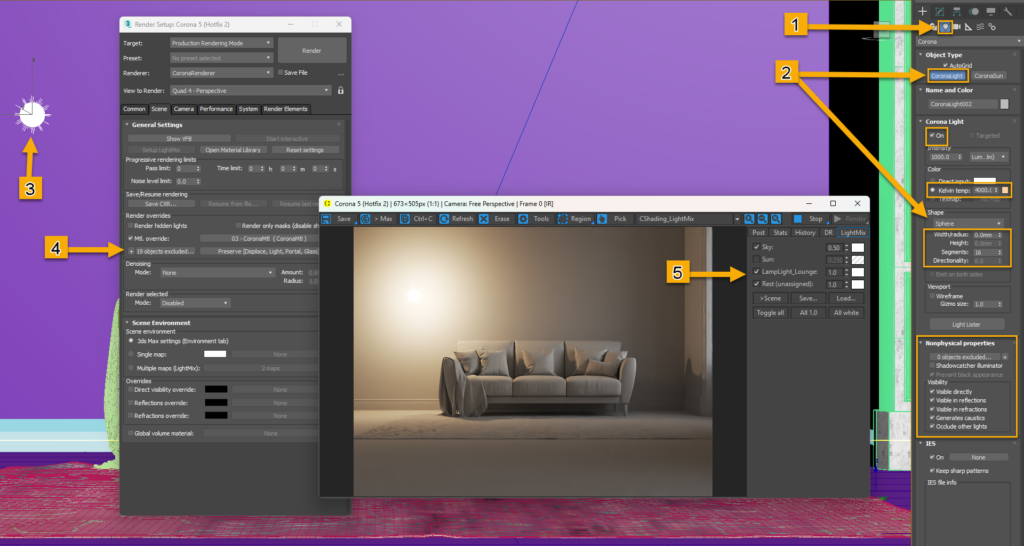
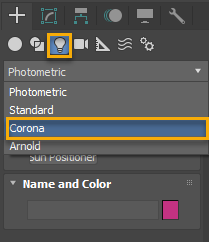
1. We go to the Bulb to get the Corona Light.
2. By pressing CoronaLight we access Corona Light options. We select Kelvin Temp to define the Light tint in Lumen units. We added into the scene our Sphere Shape.
3. Placing the light in the scene to test it.
4. Excluding the light from the Greymat.
5. Adding the new light within the LightMix to add more control to the final render (creating new CShading_LightSelect and adding the Sphere within the “specific light sources “box).
In case we need a specific mesh to emit light we could apply it to the material CoronaLightMtl from the Material Editor.


