

New episode to keep improving our render skills, but this time some bits about camera configuration within Corona for 3ds Max.

Table of Contents
Point 1: Select Frame & Place the Camera

Shortcut SHIFT + F: this will make MAX to display in the viewport the portion of the image will appear in the render based on the current camera configuration (Render Setup > Common Parameters > Image Aspect).
The Image Aspect will define this portion of the scene:
Horizontal Images: 1.3, 1.5, 1.7
Vertical Images: 0.8, 0.75

Tip: When we try to select the scene that we want to render, we need to ensure the vertical lines of the walls are perfectly vertical and the camera is parallel to the floor. In order to get this we can press into the Box icon we have in the right top corner to align the camera (avoid tilting the camera).

You can start looking for the right frame by panning the camera with the MMB, which will keep the verticals aligned, and once you get the desired picture in the viewport (SHIFT+F mode) then set the camera right there.
In order to set the camera… we can go to the camera icon and then hit CoronaCam…

Now drag in the viewport (bottom of the frame) the mouse from left to right while pressing the LMB… the camera appears pointing to the right.

The Camera is now there and needs to be set in our viewpoint to cover what we are seeing in the viewport…the shortcut for this is Ctrl+C.

Now you can fly around your scene freely… and in case you want to see through your new camera, you just need to click the Active Viewport menu and select the camera you want to use…

Another quick way to go to your camera is with the hotkey C which will open the Select Camera panel as below.

Once you are looking through your camera you can keep changing its position and an excellent way to do it is with the Orbit Function (Left bottom corner as below). Your pointer is now Saturn…

Select one object over the one you want to rotate the camera and click LMB to Orbit it…if you hold also the Shift Key, it will block the up and down motion, just allowing you side to side…awesome.
Point 2: Configure the Camera
We have the camera and now we are going to talk about what we need to consider to get a great picture.
Sensor & Lens > Field of View: This is the value that represents the maximum area of a sample that a camera can image. We can play with this to get most of our scene without losing its realism in terms of proportions. Try to keep as low values as possible.
Height of the Camera: This should be between 70 to 130 cm. Remember to change this value by pressing the MMB within the camera to keep the verticals aligned unless you have the below option selected .

Tilt & Shift: In case you want to play with the height commented above or try to orbit over certain spots of your scene, remember to tick this option to make Corona preserve the straightness of the vertical lines.

Point 3: DOF (Depth of Field)
On some occasions, we want to make a more artistic photo that seeks to trigger certain feelings in the viewer by focusing its attention on a specific spot of the scene. In order to make this possible we leave the focal point sharp leaving the rest of the picture a bit blurry.

Corona allows you to make this possible by configuring the Depth of Field.
We are going to have two blurry areas. The first one is the Depth of Field near Limit, which is basically the space between the
camera and the element we want to focus on, and the second one is the Depth of Field far Limit, which is the second portion that also will be blurry (the field between our protagonist and the farthest point of our scene).
This is pretty easy to configure in Corona as we just need to click the Object button which will activate our mouse for us to select in the viewport the object we want to focus.
The level of distortion of those blurry sections can be defined from the F-Stop field (Sensor & Lens). Values between 4 to 5 are very convenient.
Point 4: Getting some help from a nice script
There is a lot of science behind the composition and we can get surprised about how much benefit we could get if we apply some of it.
There is a nice and simple plugin that we can Download for free from the link below (UPDATED 10/05/22).
Link to Download the Script: Image Comp Helper | ScriptSpot
We drag the .ms into the view port and then we rescue it from Customize User Interface (RMB in the menu > Customize):

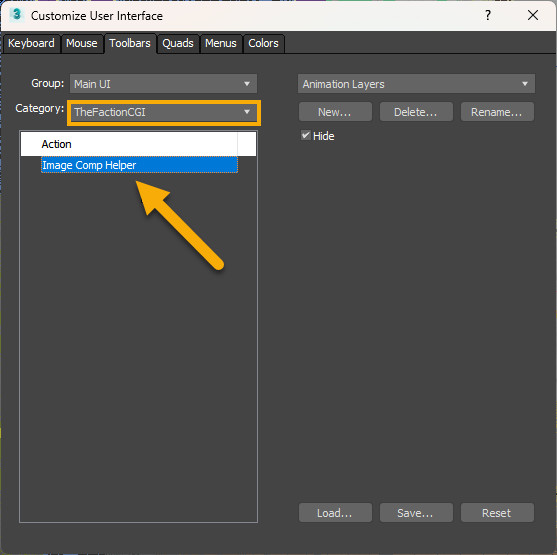
Once again drag the Image Comp Helper from the Customize User Interface panel to the functions bar as below.

The tool will project in the viewport some guidelines to help the composition. The most used ones are the Rule of Thirds and the Golden Spiral.
The Rule of Thirds will divide your photo into 9 rectangular sections where you should set your focal point in one of the four central intersections to balance the picture properly. The horizon could be located in vertical lines.
Two distinct, equal lights, should never appear in the same picture : One should be principal, and the rest subordinate, both in dimension and degree: Unequal parts and gradations lead the attention easily from part to part, while parts of equal appearance hold it awkwardly suspended, as if unable to determine which of those parts is to be considered as the subordinate. (John Thomas Smith)
“And to give the utmost force and solidity to your work, some part of the picture should be as light, and some as dark as possible: These two extremes are then to be harmonized and reconciled to each other.” (Reynolds’ Annot. on Du Fresnoy.)

The Golden or Fibonacci Spiral brings a spiral based on the Fibonacci numbers that seem to bring proportion and beauty. The technique consists to set the focal point in the centre of the spiral and build the frame trying to leave elements along the spiral from more to less important, and describing different regions within the frame.

This is an amazing arena for personal experimentation.


Miguel Angel Torio
HandyTales Founder & CEO


Alright gamers, has anyone here tried out 888gamevn? I’m curious about the gaming experience they offer. Check them out: 888gamevn.
Tried my luck at lotogreenbet the other day. Didn’t win big, but it was a smooth experience. They’ve got a decent variety of games. I’d recommend it give it a try! lotogreenbet
Just browsing around and found 777ua. Is this what I have been looking for? Good way to keep entertained! Here’s the link, 777ua.
Sv388thomosv388? Tên gì mà dài thế! Mà thôi, quan trọng là đá gà có hay không thôi. Ai chơi rồi cho ý kiến phát! See the action here: sv388thomosv388
Looking to tải app i9bet? Well this site seems to point you in the right direction. The app download process seemed smooth enough. I’d say give it a shot if you’re curious to try the mobile experience! Get the app here: tải app i9bet
For those trying to w88dangnhapw88vt, this seems like a helpful link. Got me logged in without too much fuss. Might be worth saving for quick access. Give it a try: w88dangnhapw88vt
Need to phwin99login? I found this site and it worked pretty well. Quick and easy access, no major complaints. If you’re after a smooth login process, check it out: phwin99login
Yo, just checked out fil777org. Site’s pretty smooth, got some decent games. Definitely worth a look if you’re tryna chill and have some fun. Check it out here: fil777org
Alright fam, g777login is where its at for logging in quick! No hassle, straight to the action. Makes life easy, ya know? Hit it up here: g777login
Yo, gamespkdownload is the spot for getting your game fix. Downloads are legit and fast. What more do you need? Get your downloads here: gamespkdownload