

We are going to work on the generation of Uvs for our character to get a good canvas on which to texture our asset and thus avoid undesirable results when seeing the details represented in the 3D object.
Our Uvs will be the 2D representation of our 3D mesh and the cuts/ seams must be carefully selected to make this possible since we are going to unwrap our 3D object and flatten it in such a way that we can also have a good arrangement of the polygons so that the texture is uniform.
We will also see how to place the pieces in the UV-Tile and how we must keep the V-Shells in the same proportion. We will touch on the convenience of the UDIMs, talking also about how to identify the tension points of the V-Shells and how to apply the Customer or Maya’s checkers to reveal how the texture would be distributed on our 3D object.
Table of Contents
UV Editor and some starting tools

Let’s go with the UV generation process, also called UV Mapping…
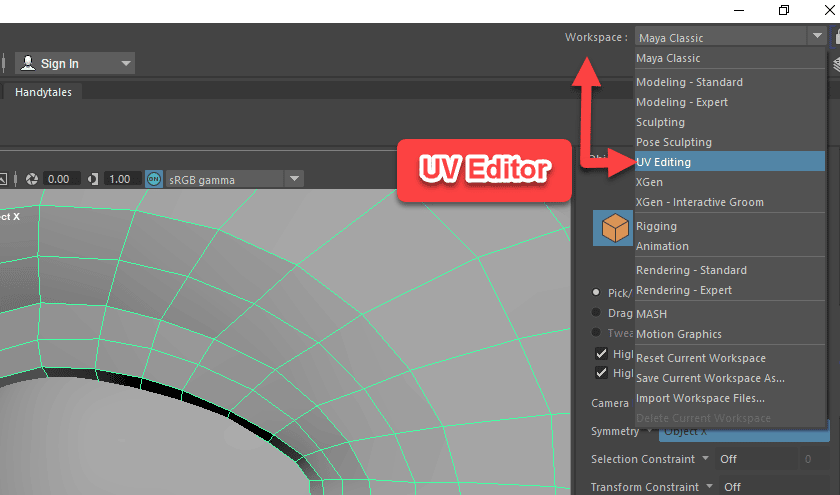
First things first… We must change the Maya Workspace from Classic to UV Editing as we see below.
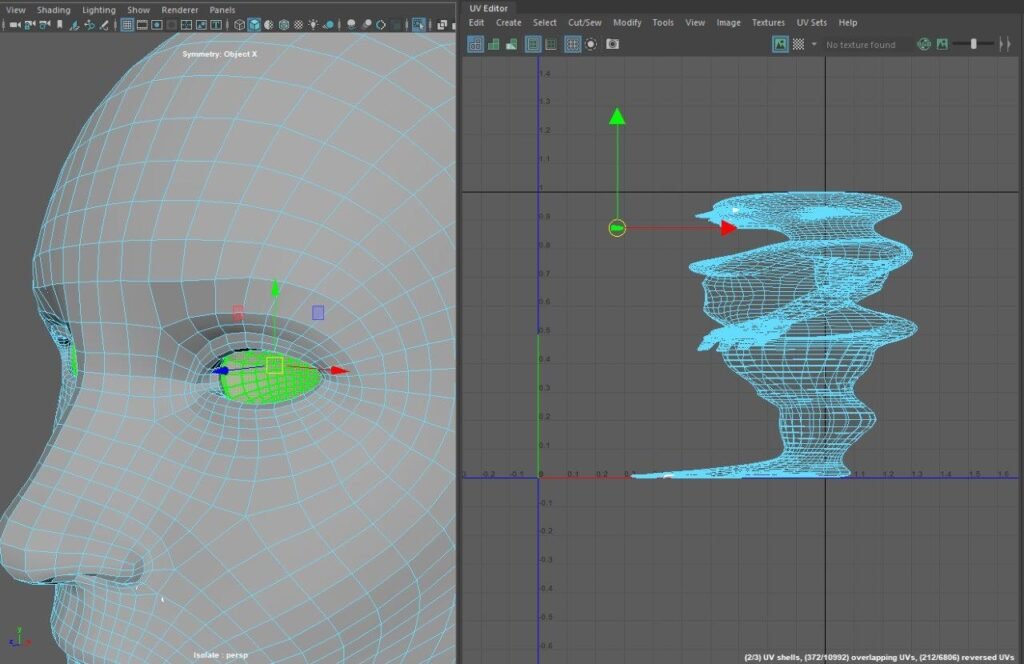
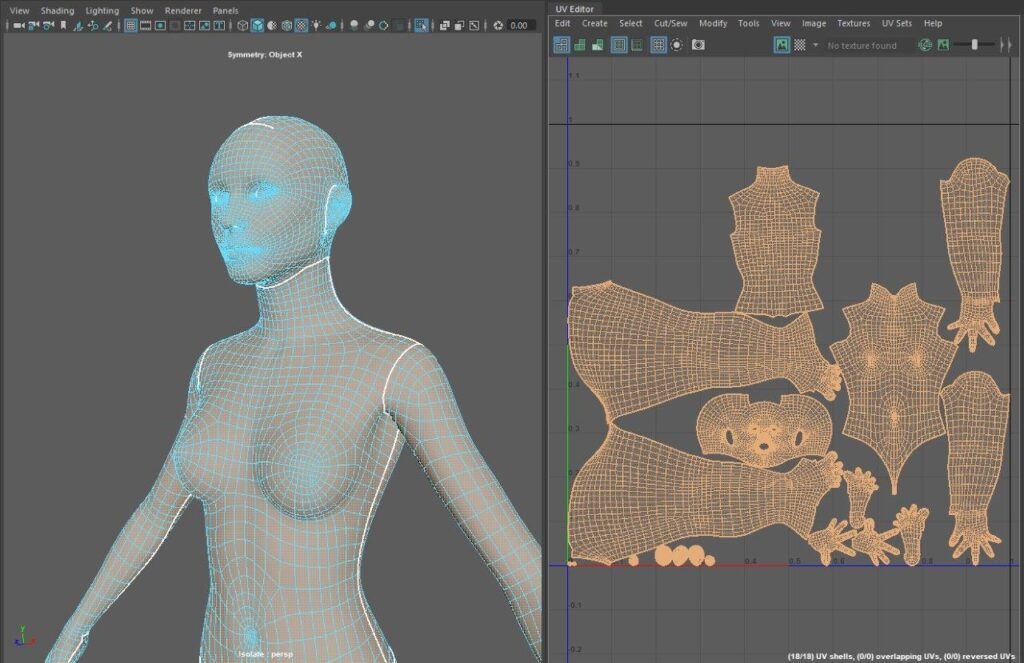
Now is the time to select in the Outliner the mesh you want to work with (in our case the character body) and you will see something like the below picture where in the left panel appears the object you selected and on the right its related UV seated in our UV tile (0-1 UV space).
I know… this spiderweb looks horrible and impossible to work with.
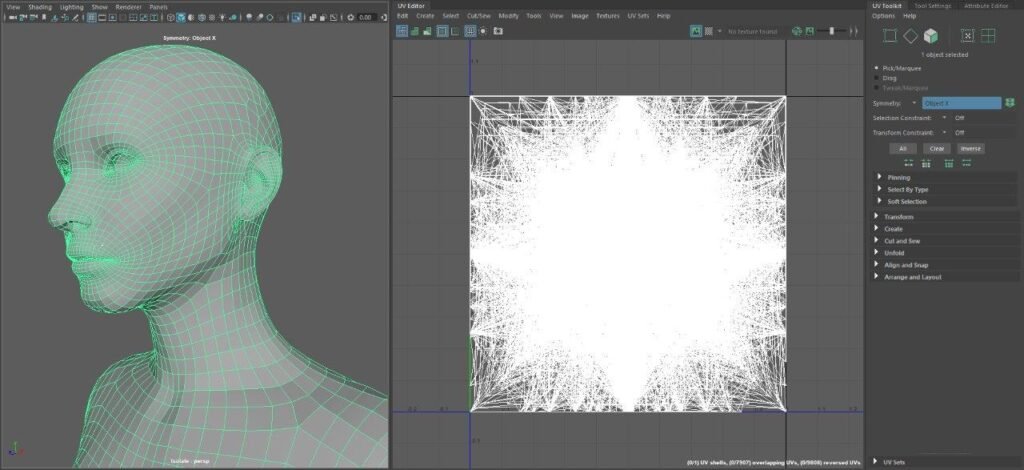
We are going to start cutting the mesh to start creating UV Shells (portions of our mesh) to make it easier to unfold the character, therefore is better if we can get something clearer as we are going to start cutting and moving the new pieces and would be something impossible to identify within the above spiderweb.
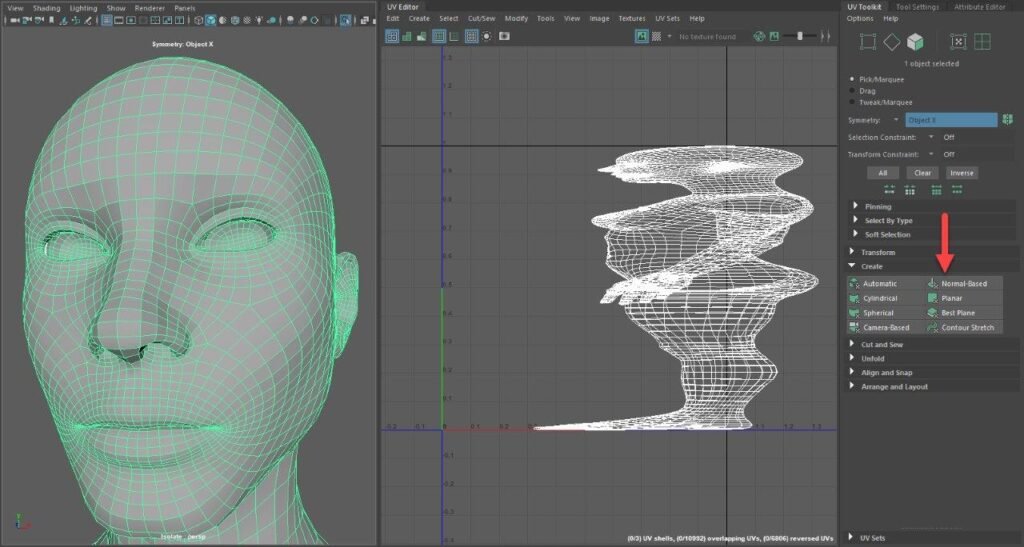
We have many ways to do this and here I paste two of them:
Option 1: Create > Normal-Based and you will see your model in a better disposition as above.
Option 2:
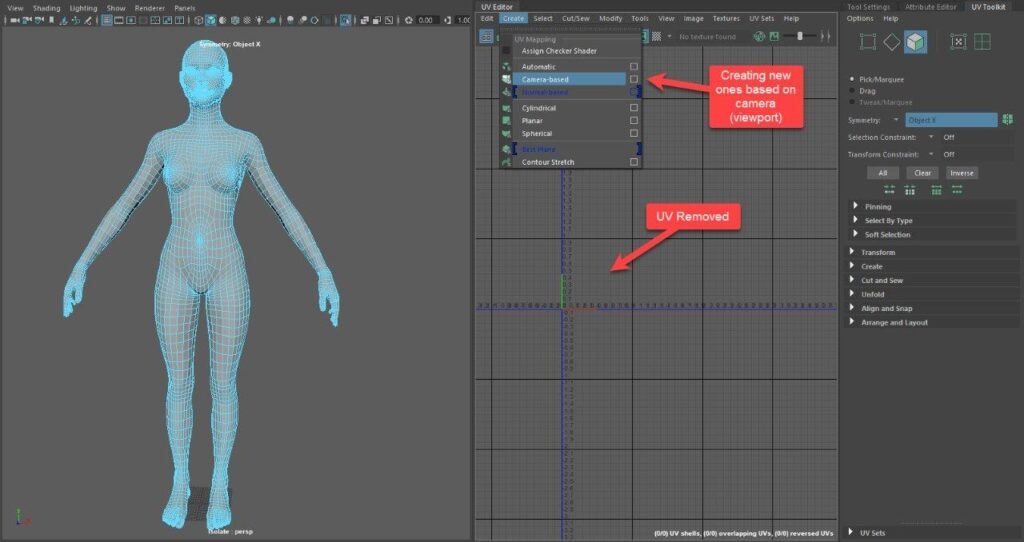
a) Select the UVs and remove them (Delete Button).
b) Select the Object in the Right Panel and position it in the way you would like to see it in the UV tile
c) UV Editor > Create > Camera based and you will have the below results.
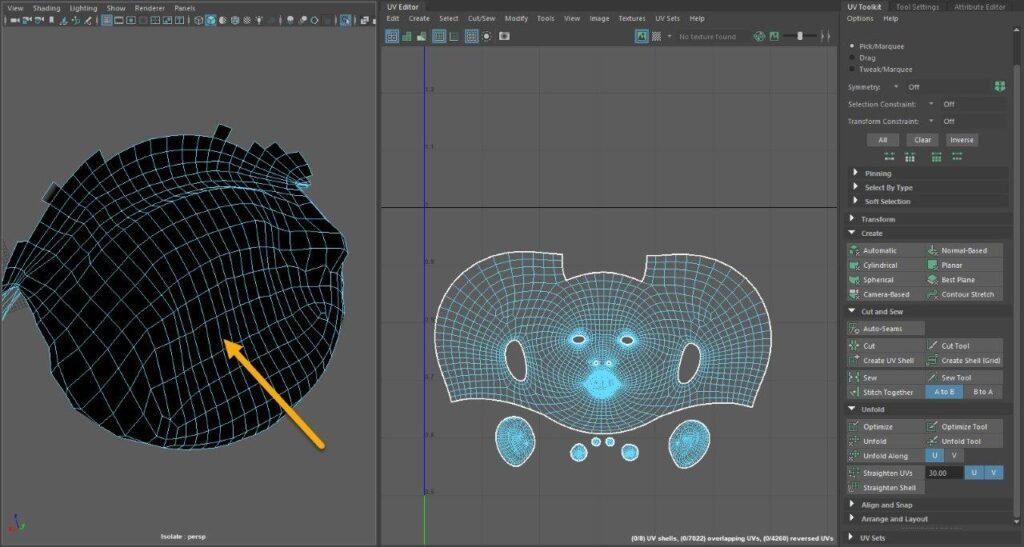
Now we are going to start cutting the mesh to create those seams that will split the pieces of the model tying to hide the cut as much as possible.
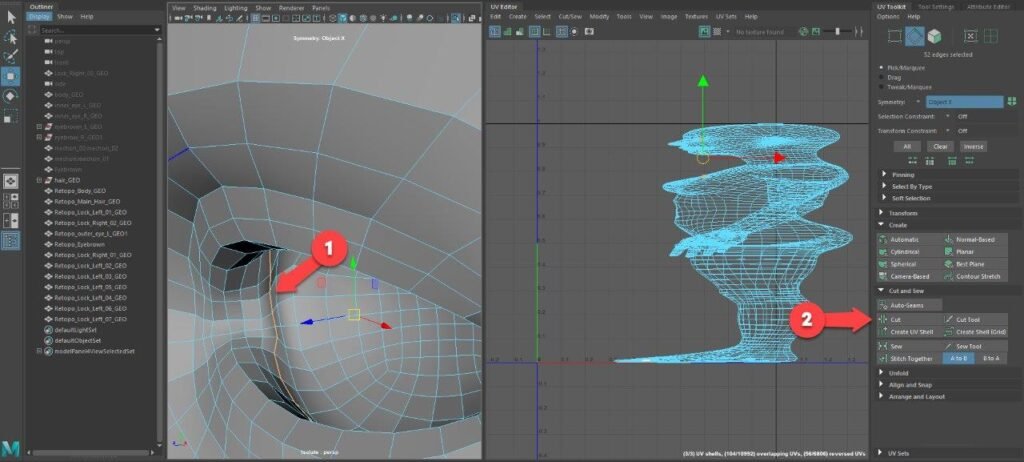
We go to Edge Mode (Right Click > Edge), and double click in the edge loop you want to use to create the seam. Once selected go to point 2 to press the Cut button (UV Toolkit > Cut and Sew). This will create an isolated mesh that we will call it UV-Shell.
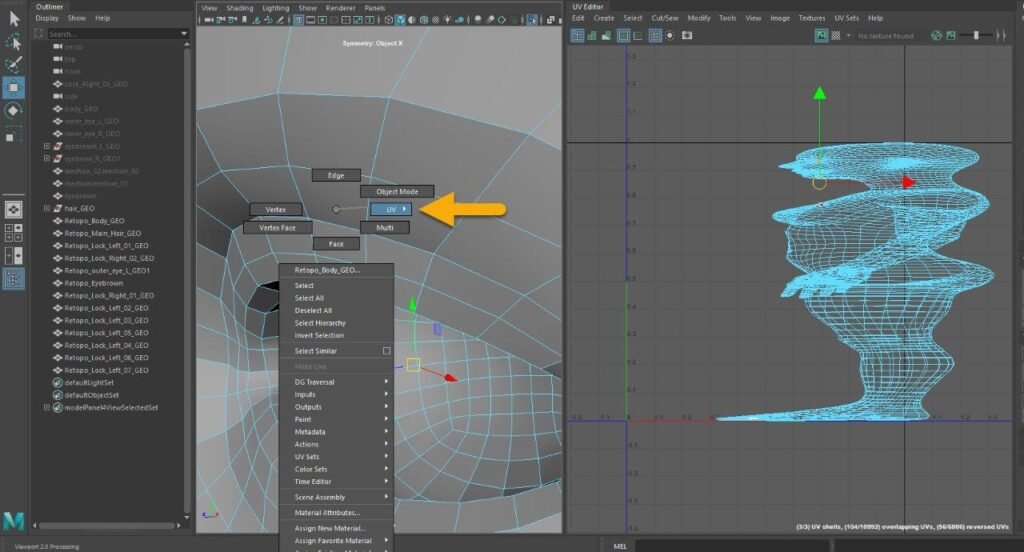
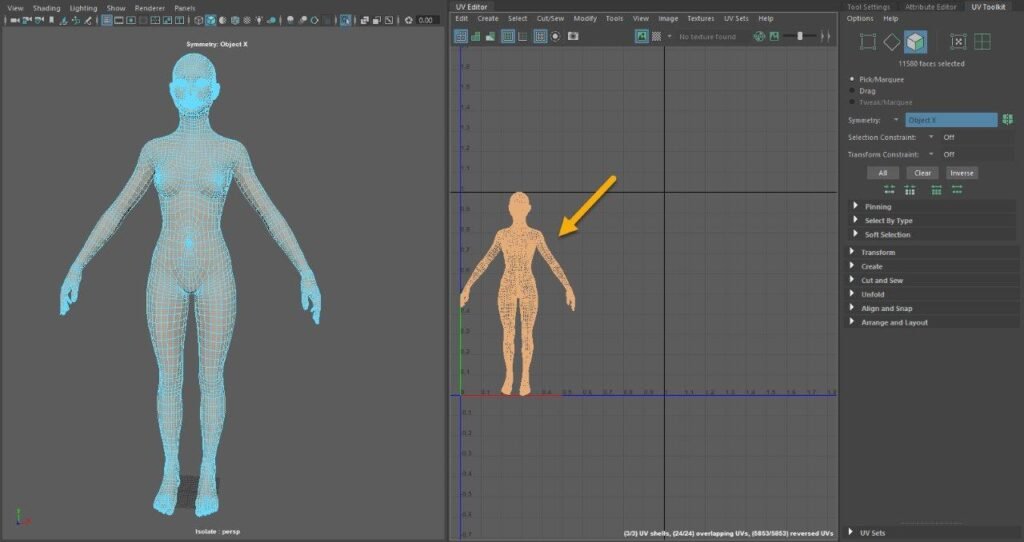
Now we can select the new UV-Shell and separate it from the rest of the mesh. In order to select the new Shell…
Right Click > UV > UV Shell.
Select the UV Shell (we have two as I performed the cut with X Symmetry) and you can move from to the right panel to leave it in a separate spot. You can also Zoom in or Zoom out by scrolling the MMB (Middle Mouse Button) and moving it by using the red/ green arrows or pressing the MMB while dragging it (Remember to have selected the “Move Tool“- Hot Key: W).
If you want to move the screen of the right panel, press ALT and move it by pressing the LMB (Left Mouse Button).
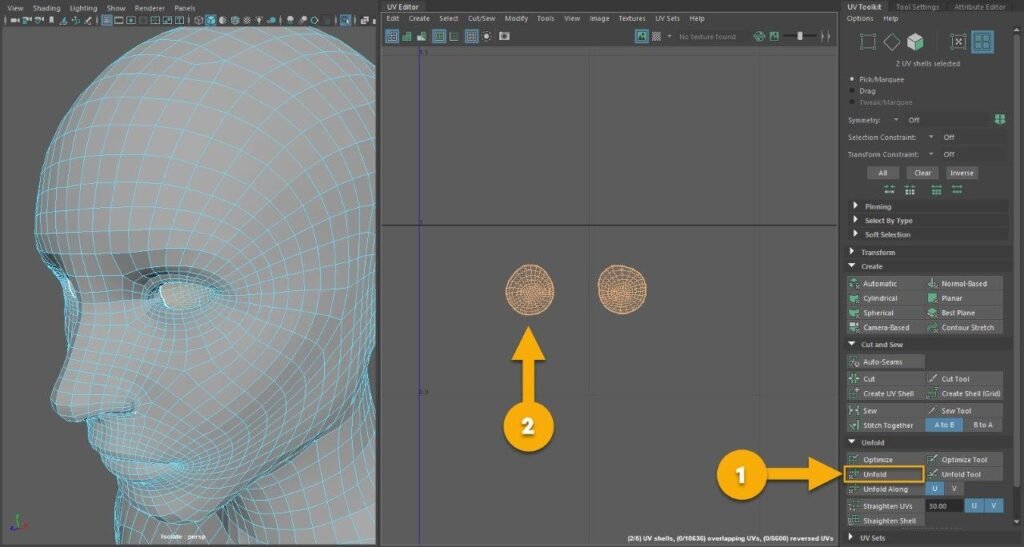
The mesh is not clear therefore requires to be Unfolded (Point 1) and will acquire the aspect of Point 2, you can also try to Optimize it by pressing several times the Optimize button (Above the Unfold button) where the improvement will depend of the situation of the mesh.
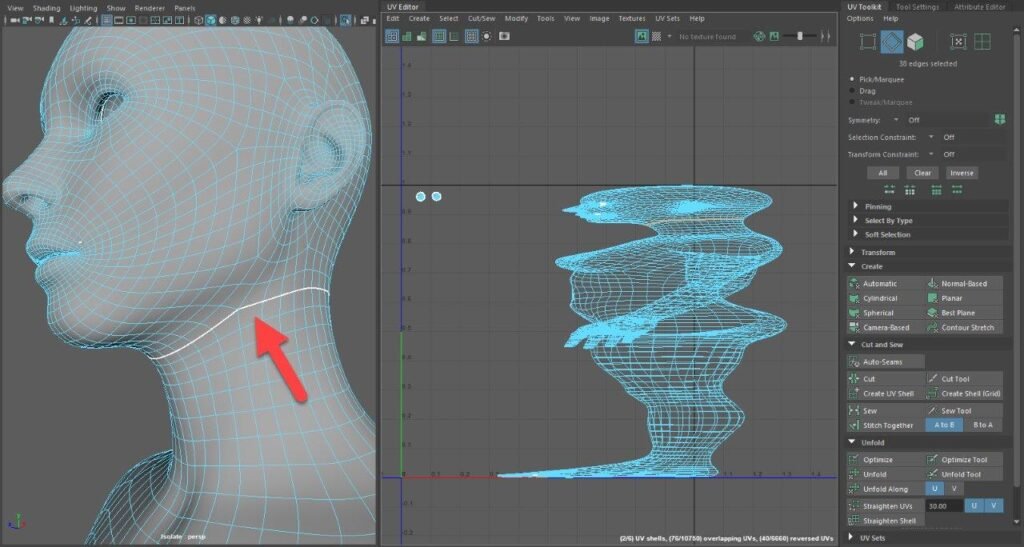
We apply another cut in the base of the head and we keep cutting the object on back, arms and legs.
Remember…In case you cut some edges but you want to sew them again as you want to apply the seam somewhere else then you need just to select the edges you do not want to be cut and press Sew from the “Cut and Sew” panel.
There is a seam in my mesh that I can not sew it
The mesh you want to separate now has some already white lines…you try to select those edges and sew them as you do not want to cut the piece from that place…but the cut (white lines) after the sewing action, remains… that means the topology has an error.
When I experience this issue I needed to go back to the Maya Classic View and fix it…normally it is due to not merged vertexes or overlapped faces, but if the edges are still there after the correction I tend to remove the affected face and add another one by using Mesh Tools > Append to Polygon.
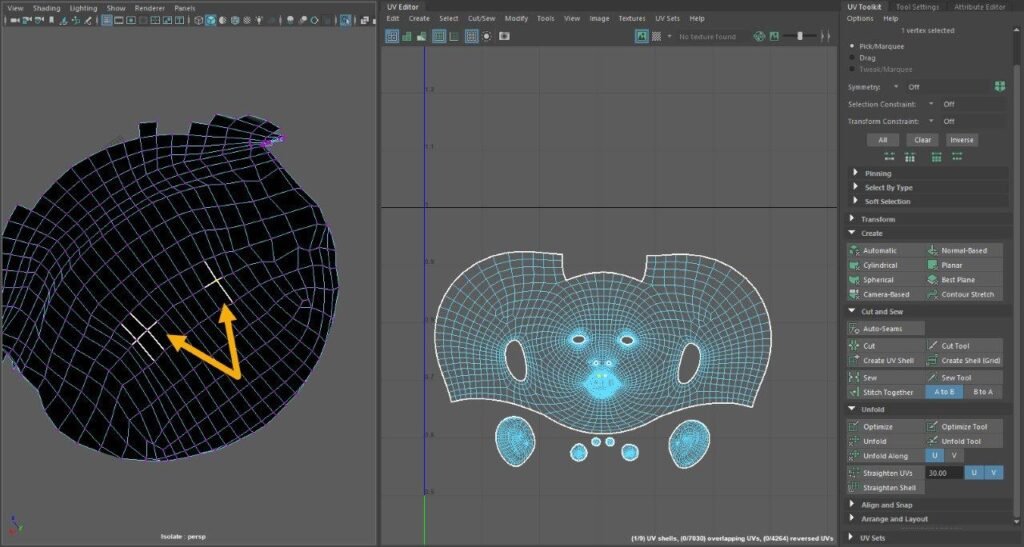
I got the same issue when I was trying to split the inner mouth piece, I detected those white lines that did not disappear after sewing the entire mesh. I tried to apply “Sew” locally…and nothing.
I found a vertex that was not merged and I had also to remove and redo one face. I applied again for the Sew locally and done!
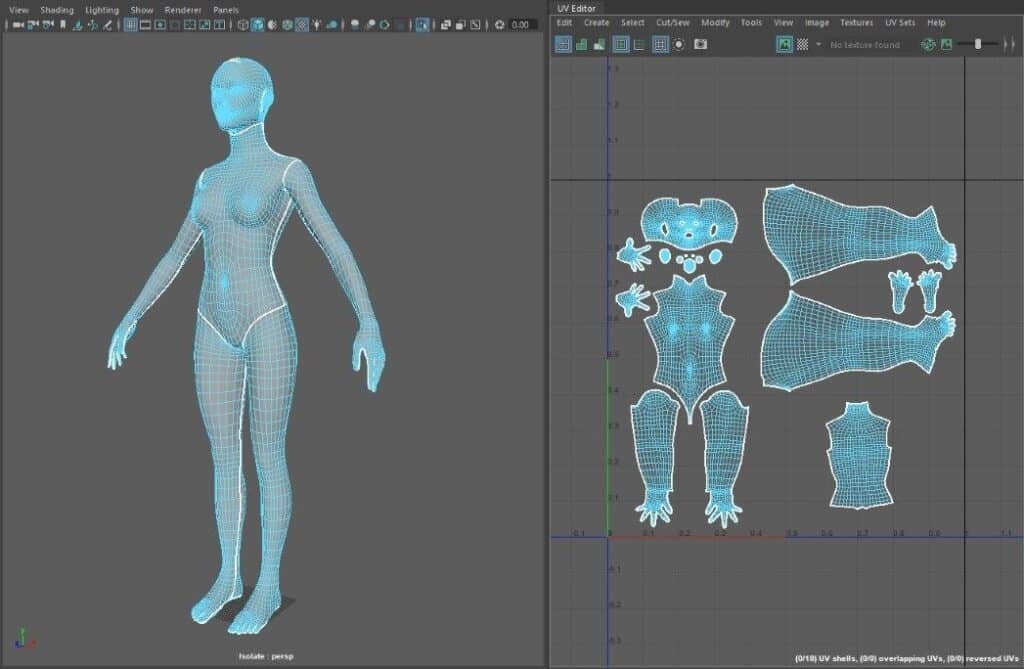
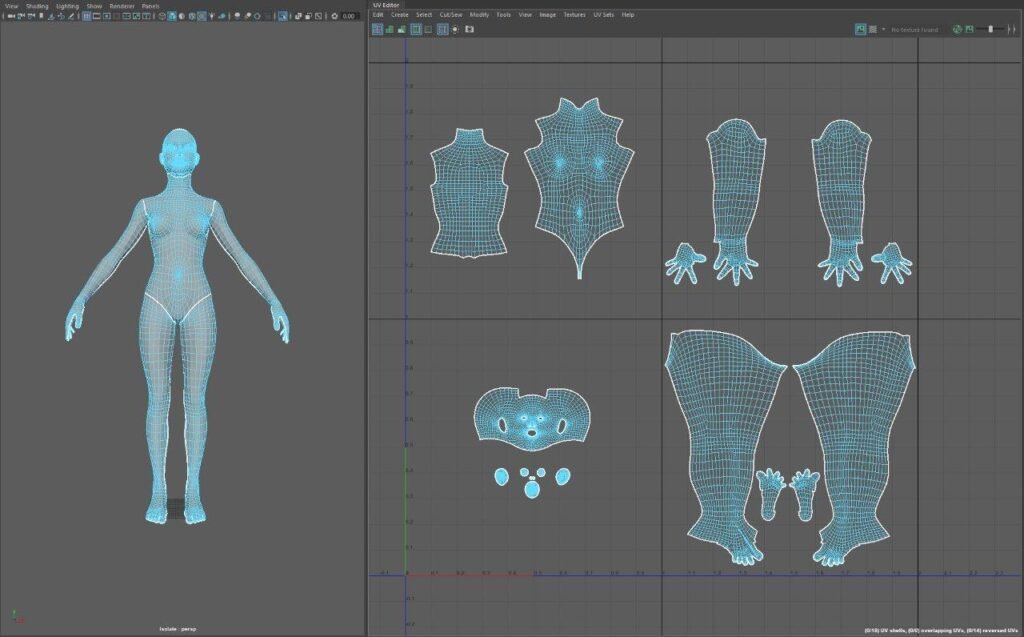
I kept doing the same process along the entire mesh and I sorted the pieces in the first UV-Tile. You can move, rotate and scale the UV-Shells by using the Move, Rotate and Scale Tools (Hot Keys W, E and R respectively).
Advice 1: Try to split the mesh symmetrically.
Advice 2: Apply as few cuts as possible and hide them as much as you can.
Advice 3: Avoid the V-Shells touching the V-Tile’s limits as it will produce issues in later map generations.
Advice 4: Keep the V-Shells in the same proportion. How can I you do this?… Explained in the next point.
Advice 5: Try to reduce tension as much as possible… Explained after the next point.
How to keep the V-Shells within the same proportion
In order to keep coherence in the V-Shells size for better results during the texturing process we can use the tool
UV Toolkit > Transform > Texel Density, as highlighted in the below picture.
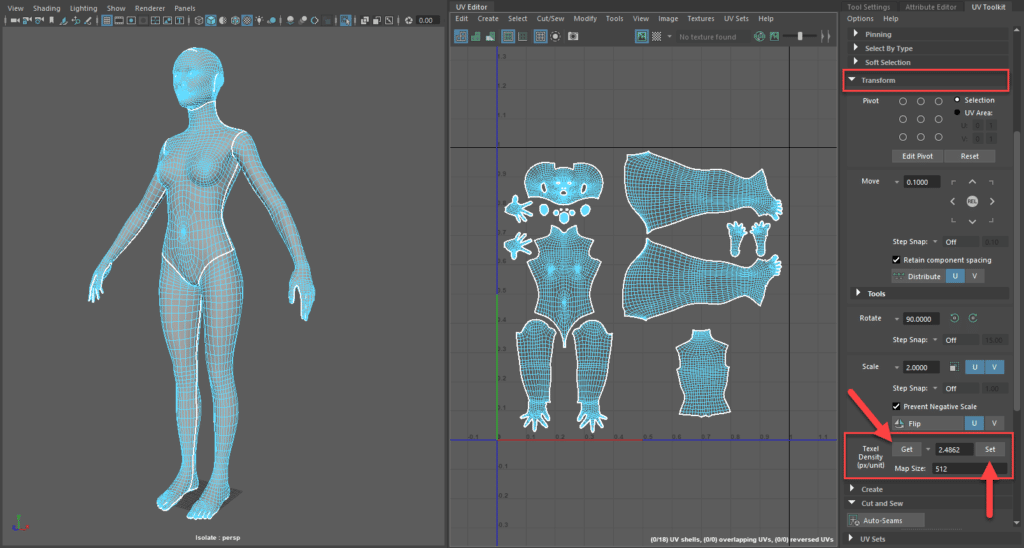
Select the V-Shell you consider has a good size, for example, the head, and press “Get“, this will capture the proportion of this shell, then unselect this and select all the other V-Shells and press “Set” to apply the same proportion.
How to check the tension on my UVs?

The tension can be reviewed by selecting UV Editor > View > UV Distortion. Your model has now applied a shader that color in Red those points that are stretched, Blue when are compressed and white when it is as they should.
You can also activate this mode by clicking in the below icon:

We have slight red on nose and breasts. In order to reduce tension we can add more cuts to relax the mesh, although we are going to leave it as in our case the solution will worse the situation.
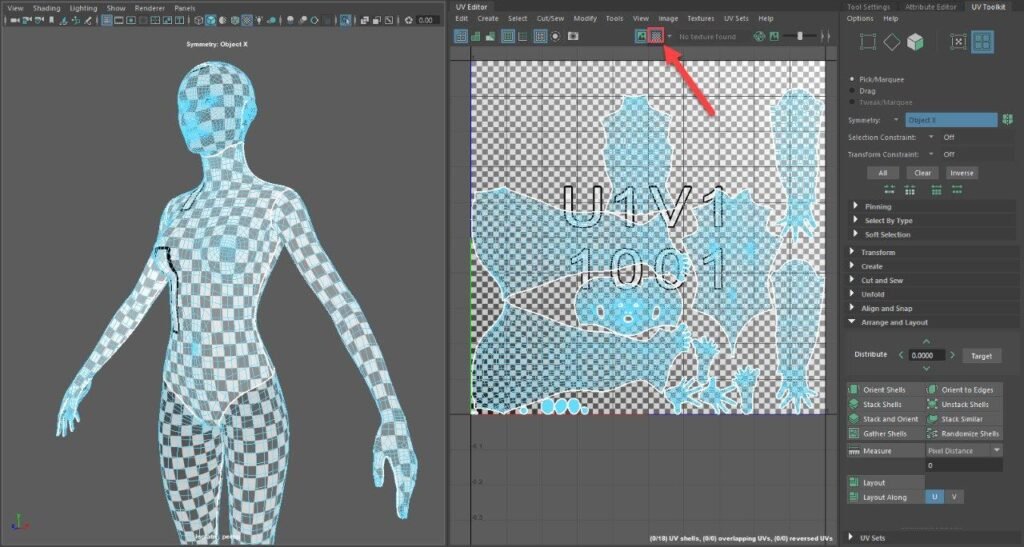
How to sort and distribute the V-shells along the tiles?
In case you have too many V-Shells in your project, Maya can help you to sort them all within the tiles you require.
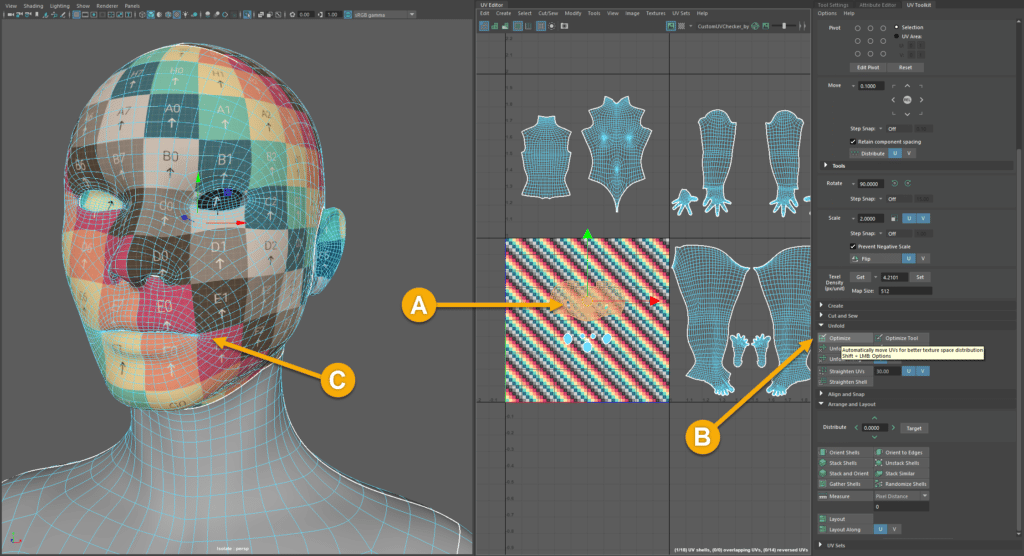
Select all the Shells in the UV Editor and go to UV Toolkit > Arrange and Layout and hold SHIFT + press the Layout button (Option 1 from below screen)… and the next screen box will pop up.
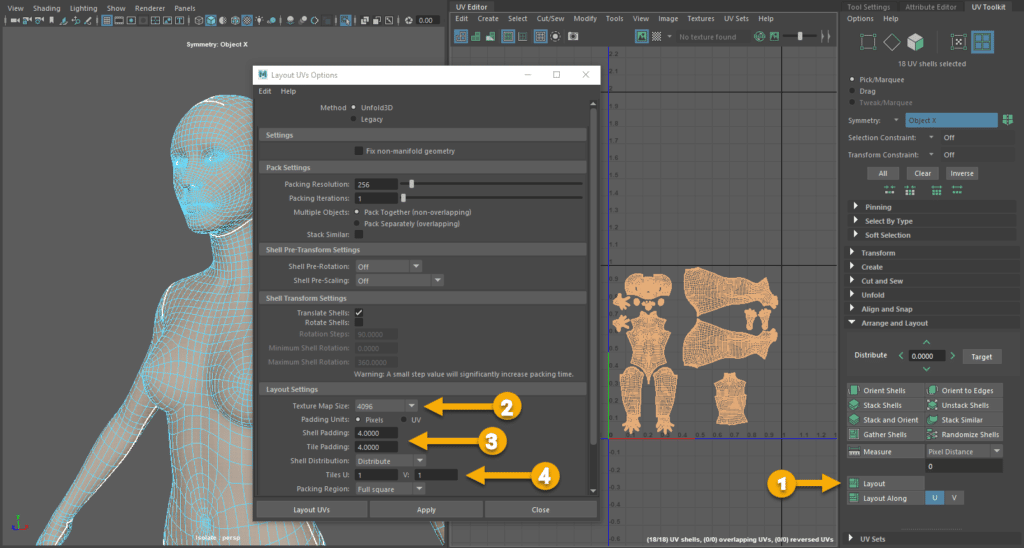
From here you can determine the resolution represented by the UV tile to apply the distance with margins and Shell padding based on this texture size (Option 2). We selected a 4K one.
Select the number of Pixels you want to separate one V-Shell from the other and also the padding with the tile (Option 3).
Finally decide how many tiles you want to use to distribute the V-Shells, in this case, we are going to keep them all in the first tale (U1, V1) and then click Apply/ Layout UVs…
Observe in the next screen the result of the process where you can see the automatic distribution where the shells seem to be touching between them but it is because I selected the 4K resolution where 4 pixels appear in a tiny space at this camera distance, if we zoom in we will see the defined gap.
At this point of the process we have all the V-Shells in one tile, then we can start thinking if we need to structure the UVs in UDIMS… in other words, Do you want to use more than one Tile to distribute the shells as you might want to apply easily different textures with different resolution on each part of the model?
Do we need UDIMS for our project?
UDIMS stands for U DIMension presents a UV-Shells distribution in tiles where every tile will have a different texture as the tile has its own UV Space. This is used for example if part of your item requires a very high level of detail as it will be very close to the camera and you do not want this to be seen on high-resolution screens with a not well-defined texture, but you want to apply lower resolution to other parts of the same object less exposed to the viewer to increase performance.
Our model is the body of a female character and we might need to apply 4K/8K textures on the face and upper body but lower textures on the legs and feet therefore would be nice if we can have the V-Shells separated in tiles to grant greater flexibility when we start texturing the object without having to do extra work.
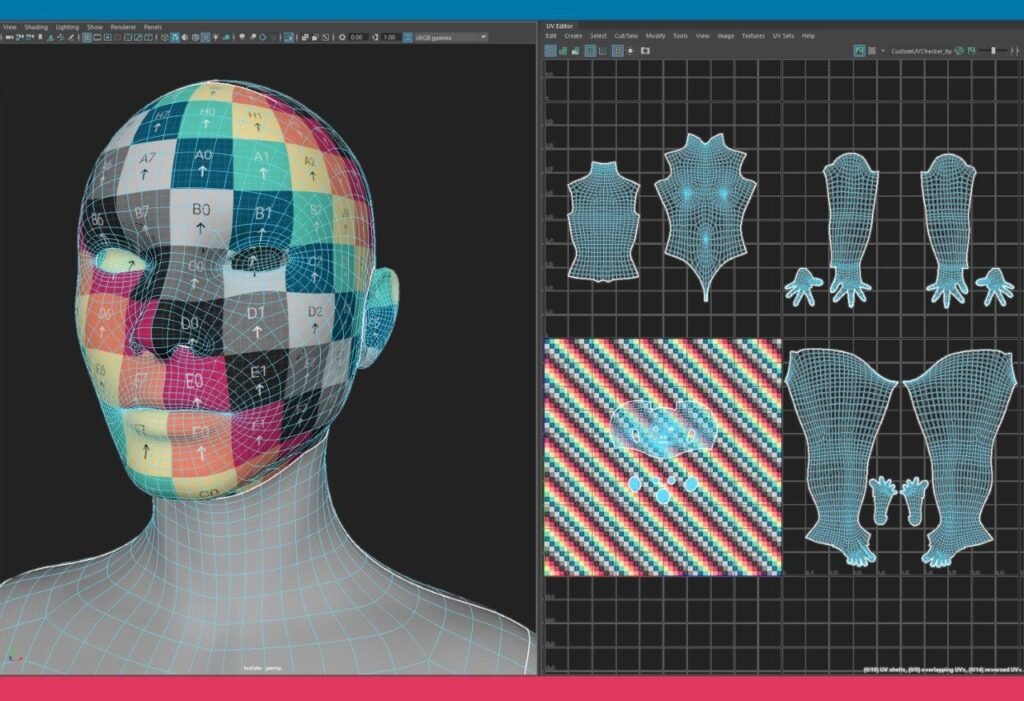
Adding Checker (Maya’s Default & Customized)
The checker has the function to alert us when the seams need more work to do as could produce distortions in the texture between both sides of the seam.
Maya comes with one Checker by default and can be activated by selecting the black and white icon that you can find on the top of the UV Editor, otherwise if you want to use another checker you can download one and apply it to your mesh. The one I am going to use comes from UV Checker Map Maker – Custom UV Textures (byvalle.com).
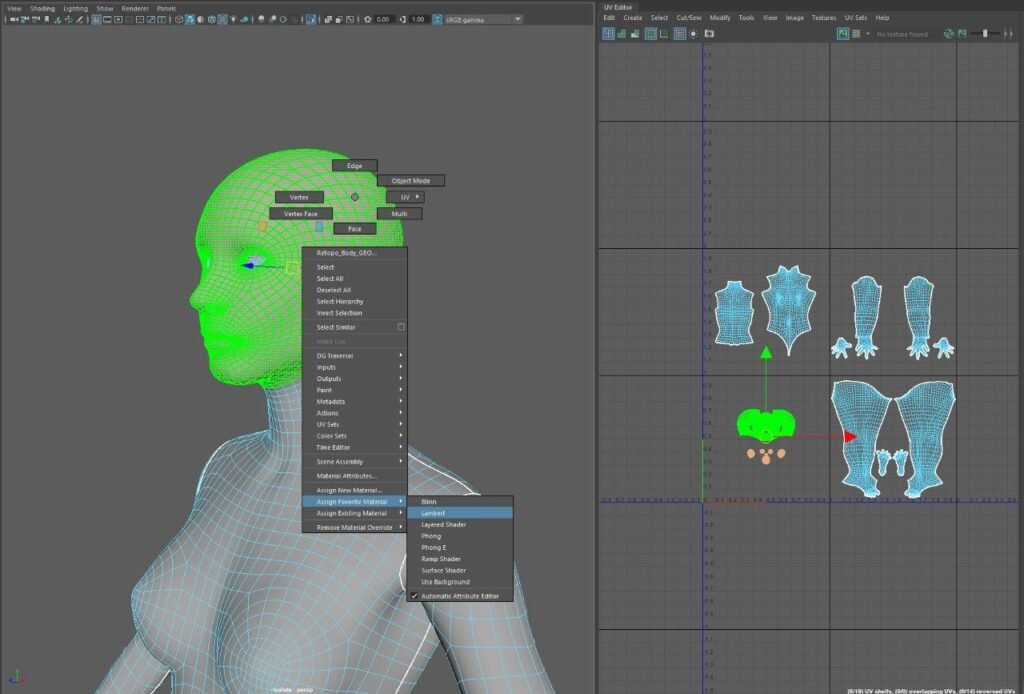
1. Select the UV-Shells you want to apply the checker and hold RMB (Right Mouse Button) while you go down to the menu till “Assign Favorite Material” to assign a new material to the selected mesh and select a predefined one…in our case we selected Lambert.
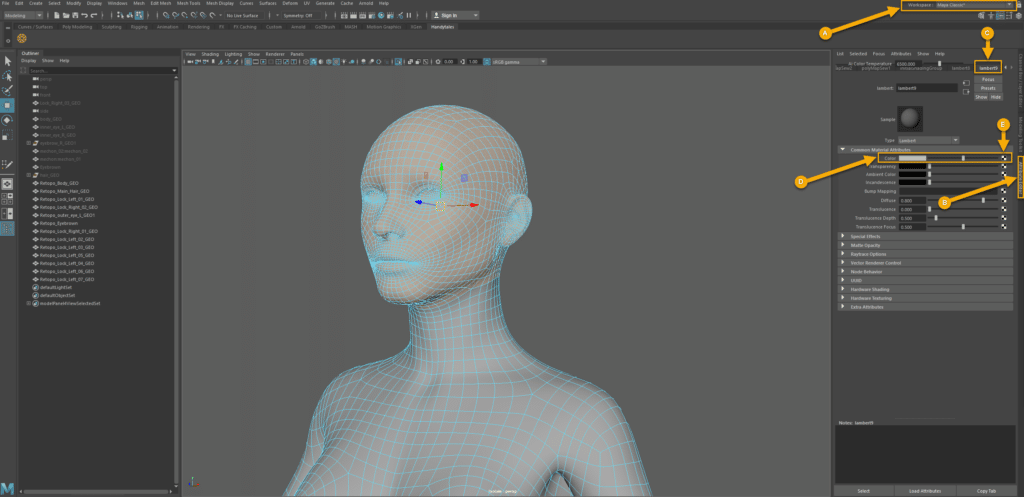
2. The material has been assigned, then we go to Maya Classic Workspace (A) and we go to the Attribute Editor (B) and get the configuration of the assigned material by going to the last item in the list (C) and locate the Color within the section “Common Material Attributes” (D) and click on the checker icon (E) and the below pop up will show up.
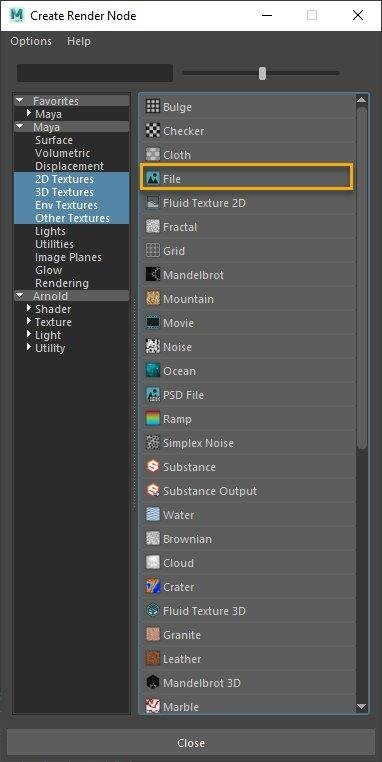
3. Select File from this “Create Render Node” screen as we want to bring a new node where to attach our custom UV checker.
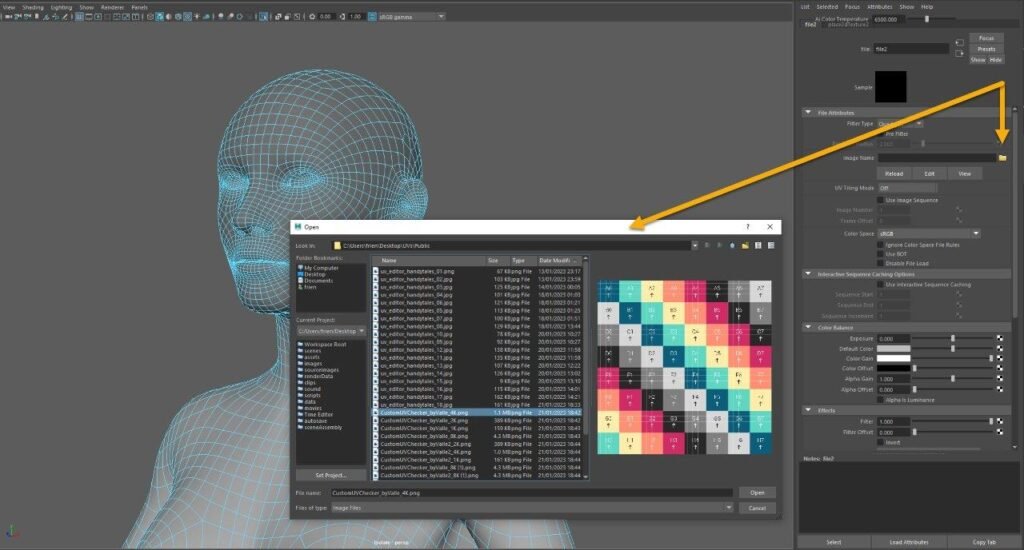
4. Select the folder from “File Attributes” and load the custom checker.
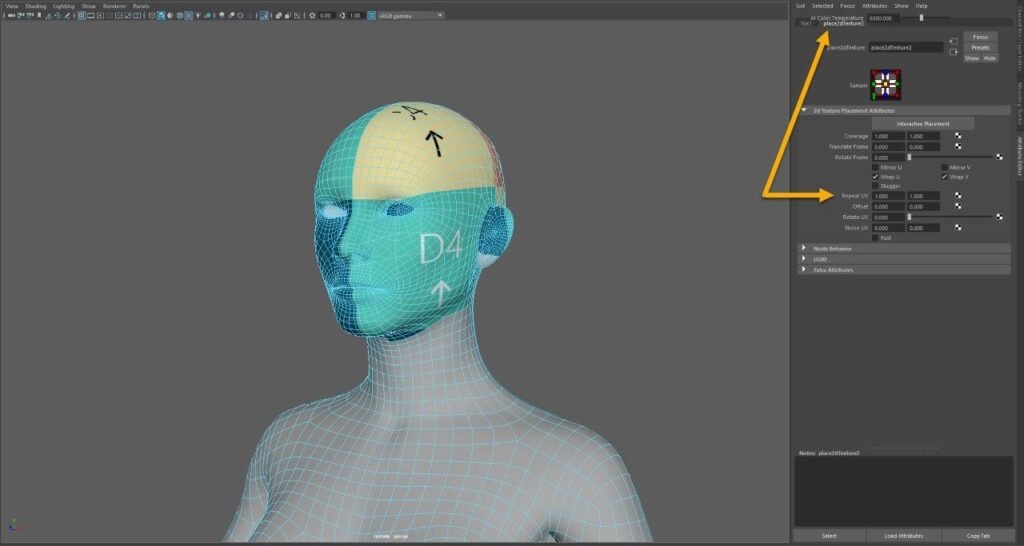
5. The custom checker has been applied but the squares seem too big for me to have some inputs from it, the File we added comes also linked with another node named Place2dTextureX, this is a controller of the texture where the way to decrease the size of the squares is by repeating the texture (Repeat UV). We will repeat it 6 times…
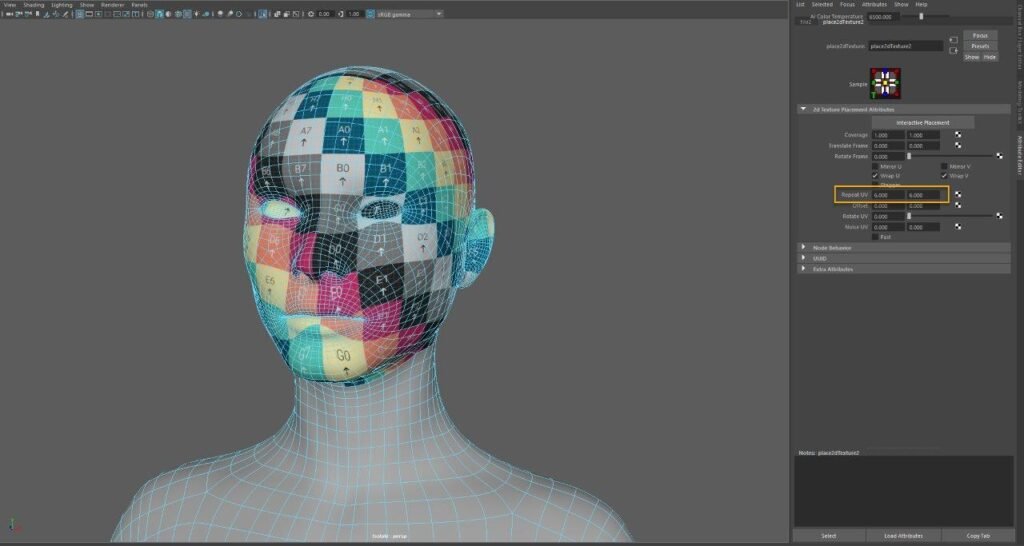
I do not like how the pattern looks in the lips section, this will bring me later issues…then I go to UV Editing Workspace again and I will try to optimize this V-Shell (A) initially just by pressing several times the already presented Optimize button (B) from the Unfold section.
It seems the misalignment was corrected, then I repeat the same checker process with the other V-Shells of the body looking for some other issues.
Remember that if you use this system the texture will remain in the first tile. In case you want to apply the texture independently on each UDIM tile you should have the below matrix in mind as you will need to use the UDIM name convention, that is basically… UV_Checker_1001 where 1001 is the tile identification (u1,v1).
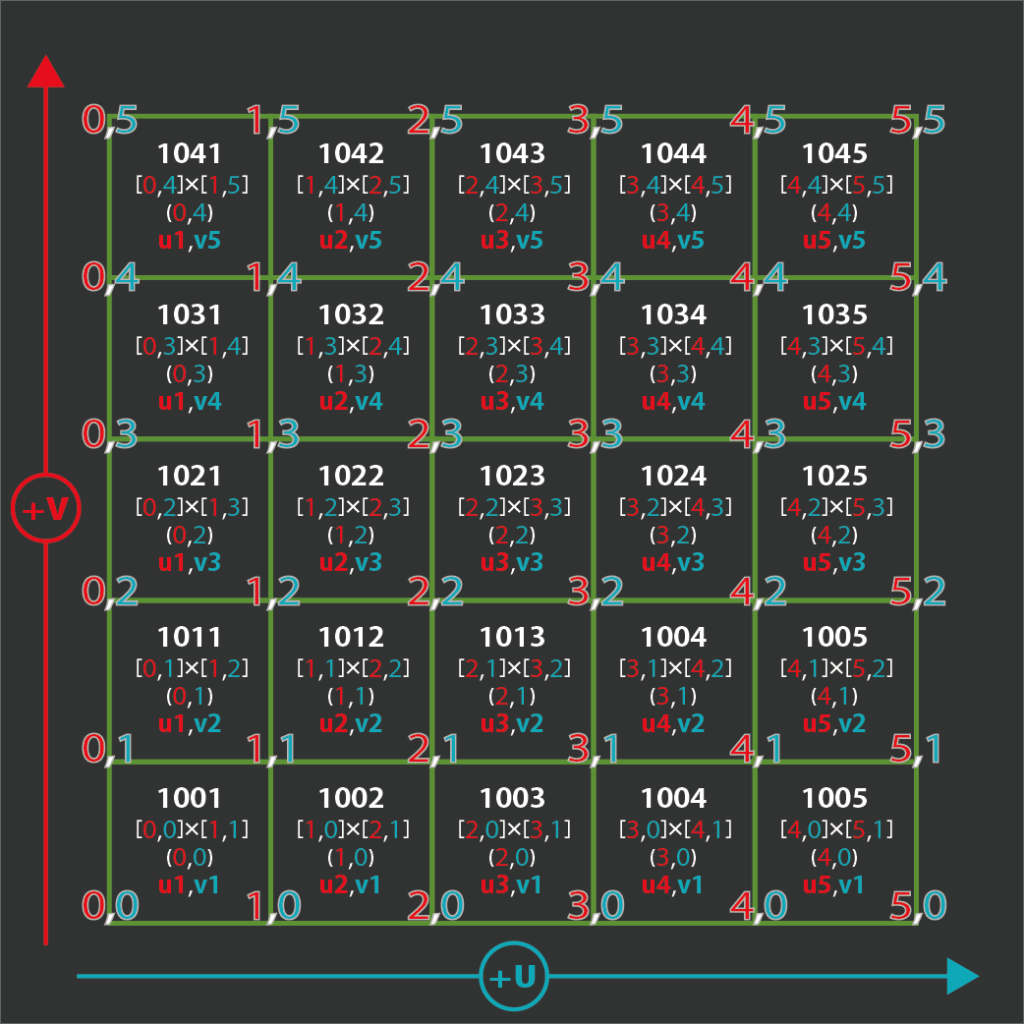
The above matrix will let you know the name of your UDIM checkers, in our case, we will have to create four files with the below names.
UV_Checker_1001
UV_Checker_1002
UV_Checker_1011
UV_Checker_1012
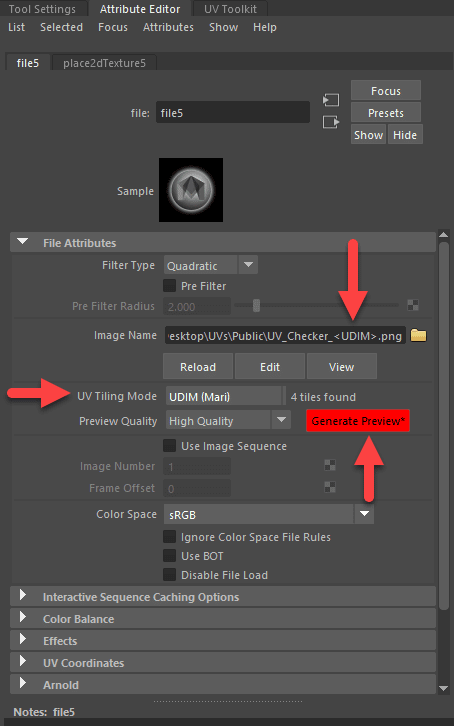
Now what we would need to do is to change to UDIM (Mari) the UV Tiling Mode that will change the tile identification of the checkering file into <UDIM> tag as shown above where Maya now identifies 4 tiles! At this point you will realize the texture is not covering your mesh, to make this happen just click the “Generate Preview” button that is in nuclear red color.
Thanks for reading us.

Miguel Angel Torio
HandyTales Founder & CEO


Okay, Okiebetapp is pretty solid for betting on the go. Easy to use, and they got odds I can appreciate. Might be worth a download if you want a quick gamble. Look here okiebetapp.
Pito777, eh? Definitely got some interesting vibes goin’ on there. Not bad at all. Might be my new go-to when I’m bored. See what you think at pito777.
Heard you’re looking for the Axiebet88 download? Well, I just did it myself and it was smooth sailing. No sketchy stuff, just a quick download and install. The mobile experience is pretty good too. Grab it here: axiebet88download
Downloaded the E88apk the other day. Seems pretty solid. Makes playing on your phone dead easy. Give e88apk a download if you’re after some on-the-go fun.
Needed a new betting app, and stumbled across Betwindownload. So far, so good! Super easy to install and use. Check out betwindownload.
Alright, alright, iwinclubcashou, eh? Easy enough to cashout, I’d say. Gave it a run last week. Check out iwinclubcashou if you’re looking for something new.
22phdreamlogin! Logging in was a breeze. Found my favorite games right away. Site feels secure, which is a big plus for me Check this page out 22phdreamlogin.
Hey peeps! Checking out xp786game for a while now. It is pretty good for a quick game before bed – haha! xp786game.
WG777login? That’s where it’s at! Made the login easy peasy. Take a gander wg777login
Manalobet, haven’t heard of this one before. Time to dive in and see what it’s all about. Maybe it’s my new favorite!. manalobet
Checked out mj777game the other day. Not bad, decent selection of games. Worth a look if you’re bored. Give it a shot at mj777game
Orionplaycasino is pretty cool. Smooth interface and some fun slots. Give ’em a try, maybe you’ll get lucky. Check ’em out at orionplaycasino